Welcome to your ultimate guide for creating a creative haven that works as hard as you do. Imagine walking into a space where every supply has its place and inspiration flows freely. This comprehensive resource will help you transform any area into a functional, joyful environment.
We’ve gathered insights from real-life transformations, including an impressive 11′ x 22′ makeover and a custom-designed 16′ x 20′ creative zone. These examples prove that smart planning makes your hobby more enjoyable and productive. The right setup can completely change your creative experience.
Whether you’re working with a spare bedroom corner or a dedicated studio, the core principles remain the same. Intentional design, clever storage solutions, and workflow-supporting systems create the foundation for success. Your personal sanctuary should reflect your unique creative process.
An organized creative space isn’t just about looks—it’s about efficiency and joy. Reduce project setup time and eliminate the frustration of searching for materials. Focus on what you love rather than managing clutter.
Key Takeaways
- Proper planning transforms any area into an efficient creative zone
- Smart storage solutions keep supplies accessible and visible
- Workstation layouts support your specific creative workflow
- Personal touches make the space inviting and inspiring
- Maintenance strategies help keep your area organized long-term
- Budget-friendly options work for spaces of any size
- The right setup can reignite your passion for hobbies
Introduction to an Organized Craft Room
Many enthusiasts discover that their creative journey starts long before they pick up their tools. The transition from scattered supplies to a functional space requires thoughtful consideration of your actual workflow.
Understanding Your Creative Needs
Begin with honest reflection about your most frequent activities. What materials do you use daily versus seasonally? How does your creative process naturally flow?
One dedicated individual realized she had accumulated supplies across multiple disciplines. She noted,
“I discovered I had two different hobbies – creating and collecting materials.”
This awareness helps design stations that support each activity. Consider this comparison of common creative needs:
| Creative Activity | Daily Needs | Storage Requirements | Work Surface |
|---|---|---|---|
| Paper Crafts | Paper, adhesives, cutting tools | Flat storage, visible organization | Large, clean surface |
| Sewing & Embroidery | Fabric, threads, needles | Protected from dust, color-coded | Space for machine and handwork |
| Knitting & Crochet | Yarn, patterns, needles | Visible yarn storage, pattern files | Comfortable seating area |
Why Organization Matters for Crafting
Efficiency is the greatest benefit of a well-planned space. When you spend 30 minutes searching for scissors instead of creating, that’s valuable time lost.
A thoughtful setup reduces project preparation from hours to minutes. This allows you to jump into work when inspiration strikes. The true value extends beyond quick access to materials.
Proper systems protect your investment in quality supplies. They also help you see what you own, preventing duplicate purchases and sparking new ideas.
Setting Your Vision and Planning the Layout
The foundation of any successful creative environment begins with clear vision and strategic planning. This crucial first step transforms random furniture placement into an intentional workspace that supports your unique process.
Defining Your Crafting Stations
Start by identifying your primary activities rather than choosing furniture. One enthusiast designed her 11′ x 22′ area around specific functions. She explained,
“Instead of placing desks and shelves and hoping they worked, I started by defining how I would use the space, then built it around that.”
Her setup included dedicated zones for sewing, paper projects, and general creating. This station-based approach ensures each activity has its proper place.
Measuring Your Space for Optimal Use
Accurate measurements make all the difference. Another creative individual meticulously planned her 16′ x 20′ room using graph paper and spreadsheets. She moved elements “about a million times” digitally before finalizing.
Critical measurements include:
- Room dimensions and permanent features
- Electrical outlet locations
- Aisle widths of 36-42 inches for comfortable movement
Planning on paper first saves both money and frustration. It allows you to test different layouts without heavy lifting.
Inventory and Decluttering Techniques
Before any furniture enters your creative space, a thorough inventory process lays the essential groundwork. This step reveals what you truly own versus what you think you own.
Evaluating Your Current Supplies
One dedicated individual shared her approach:
“I went through every single supply I own. This step was just as important as the furniture and layout decisions. And it took the longest.”
She asked herself three critical questions about each item. This honest assessment helps identify what deserves valuable storage space.
Consider these evaluation methods for different material types:
| Material Type | Evaluation Question | Condition Check | Storage Priority |
|---|---|---|---|
| Paper Products | When was this last used? | Check for fading or damage | High if current projects |
| Fabric & Textiles | Does this inspire new ideas? | Look for stains or weakness | Medium for future use |
| Tools & Adhesives | Is this still functional? | Test performance quality | High if regularly used |
| Specialty Items | Would I repurchase today? | Assess relevance to current work | Low if outdated |
Deciding What to Keep or Donate
The “would I repurchase this today” test proves remarkably effective. If you wouldn’t spend money on an item now, it likely doesn’t deserve your space.
Donation offers a beautiful release method. One person donated fabric to a local quilt group making quilts for cancer patients. Schools and community centers often welcome quality materials.
Releasing supplies that no longer fit your creative direction makes room for what you genuinely love. This process clears both physical and mental space for better work.
Mastering Craft Room Organization Techniques
Effective storage solutions can completely revolutionize how you interact with your creative materials. The right systems turn frustration into flow and chaos into clarity.
Implementing Storage Solutions
One dedicated individual transformed her space with an impressive system. She installed 40 IKEA ALEX drawers total, creating eight complete sets. “It sounds like a lot, and it is,” she shared, “but it is also exactly what this space needed.”
The drawers allowed her to store supplies by category instead of stacking bins. Each drawer serves a specific purpose for tools, vinyl, paper, or works in progress. Her goal was clear: “not to hide everything, but to make supplies easy to find and even easier to put away.”
Customization beats imitation when selecting storage. Your system should match your unique workflow and materials. What works for one person may not suit your creative process.
Clear containers and labeled drawers provide the perfect balance. They keep items visible while protecting them from dust. This dual approach ensures everything stays organized and accessible.
Start with your most frustrating areas first. Tackle the supplies you use daily before expanding to seasonal items. Function should always guide your choices over appearance.
The best systems make cleanup as simple as setup. When putting things away feels effortless, maintaining order becomes second nature. This prevents the slow slide back into disarray.
Crafting Functional Stations for Different Projects
When every project type has its own dedicated setup, you eliminate the frustration of constant setup and cleanup between tasks. Functional stations become the cornerstone of an efficient creative space. Each area should contain all necessary materials and tools for specific activities.
Designing a Sewing & Embroidery Area
A well-planned sewing station supports both hand and machine work. The Create Room DreamStation offers an excellent example with its electronic lifting system. Your sewing machine tucks beneath the surface, creating additional workspace when not in use.
Good lighting is essential for detailed embroidery work. Store threads, stabilizers, and hoops within arm’s reach. This setup lets you begin projects immediately without searching for supplies.
Cricut and Paper Crafting Station Ideas
Paper projects benefit from an uncluttered, efficient workspace. One enthusiast designed her Cricut area to keep everything related to cutting projects in one place. Vinyl, transfer tape, and cutting mats store directly below the work surface.
Organize various paper sizes and adhesives by type for quick selection. Your station should reflect your actual workflow. Position cutting areas adjacent to assembly spaces for seamless transitions between tasks.
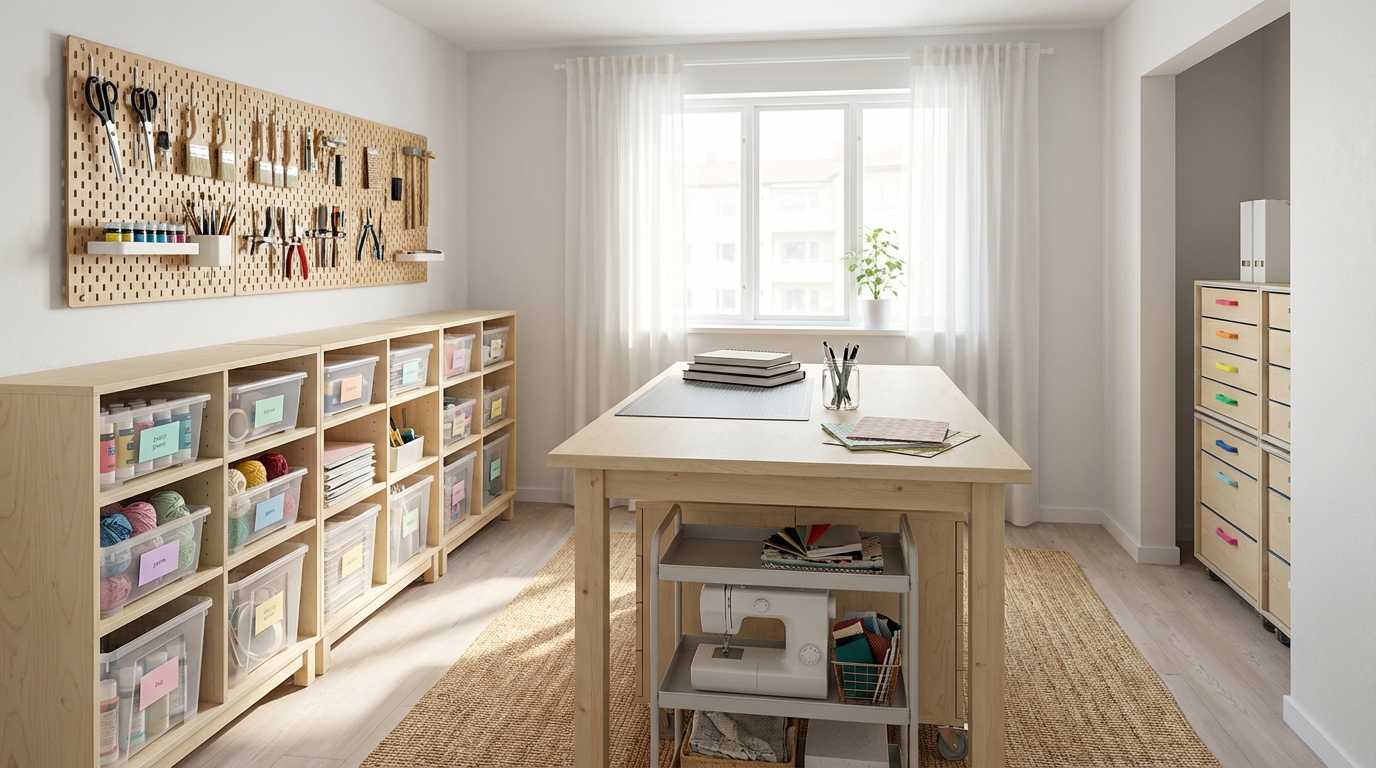
Maximizing Storage with Cabinets, Drawers, and Pegboards
Cabinets, drawers, and pegboards work together to create a powerful storage system. Each component serves a unique purpose in keeping your materials accessible and protected.
This combination forms what many consider the essential trio for an organized craft room. They handle everything from bulky items to tiny tools.
Utilizing Drawer Systems and Shelving
Drawer systems excel at categorizing supplies you need regularly but want out of sight. One enthusiast found that 40 drawers, organized by material type, completely changed her workflow.
She stored vinyl, paper, and adhesives in separate units. This made finding items quick and putting them away simple.
Shelving offers perfect visibility for supplies you use often. Fabric bolts and paper stacks benefit from open storage. It keeps your favorite materials inspiring and easy to grab.
“I wasn’t sure at first whether I really needed it, but I knew it would add flexible storage, and I am so glad I included it. Having tools right in front of me has been incredibly convenient.”
Pegboard walls provide amazing flexibility for frequently used tools. You can hang scissors, rulers, and cutting implements within arm’s reach.
The system adapts as your needs change. Simply rearrange hooks without damaging the wall. This is a key feature of innovative storage solutions.
Hardware drawer units are surprisingly effective for small items. Designed for nails, they perfectly hold beads, sequins, and brads.
These units are affordable and often found at thrift stores. They keep tiny supplies sorted and visible.
| Storage Type | Best For | Key Advantage | Consideration |
|---|---|---|---|
| Drawers | Flat items, categorized tools | Protects from dust, hidden storage | Requires labeling for efficiency |
| Pegboard | Frequently used tools | Fully customizable, visible access | Needs hook investment initially |
| Open Shelving | Bulky supplies, inspiration items | Quick visual access, displays materials | Can gather dust if not used often |
Maximizing your vertical wall space is crucial. Combine these systems to keep work surfaces clear. Every supply gets a designated home.
Budget-Friendly and DIY Storage Ideas
Some of the most charming and practical storage solutions come from repurposing items you already own or can find affordably. These creative approaches often yield personalized systems that work better than expensive store-bought options.
Many enthusiasts discover that thrift stores and everyday household items provide excellent storage ideas. One person shared, “Most of my containers come from thrifting, dollar stores, or DIY projects born from necessity.”
Repurposing Thrifted Items for Storage
Canning jars offer perfect storage for small items like buttons and brushes. Cookie tins work wonderfully for clips and clamps. Old suitcases can hold fabric scraps beautifully.
Piano roll boxes make exceptional organizers for washi tape. Their built-in compartments function like mini drawers. Cigar boxes are ideal for clear stamp sets and small stencils.
Old jewelry boxes provide perfect homes for metal charms and brads. Vintage dishes and pitchers add personality while holding pens and pencils. These creative storage ideas transform ordinary items into functional treasures.
Even packaging materials can become useful storage. Amazon boxes covered with decorative paper create custom containers. iPad packaging makes excellent trays for small supplies.
These budget-friendly approaches prove that effective storage doesn’t require large investments. Creativity and resourcefulness often produce the most satisfying solutions for your space.
Incorporating Flexible Furniture and Work Surfaces
Adaptable work surfaces and mobile storage solutions create a dynamic environment that grows with your changing needs. The right pieces transform how you approach different projects throughout the year.
One enthusiast customized her large center table using an innovative approach. She explained,
“I added four 6-inch risers to each drawer cabinet and installed two adjustable table legs in the center. The height is perfect for standing work, detailed projects, and long sessions without strain.”
This table now serves multiple purposes from pottery to group activities. It handles large-scale projects that require spreading out materials comfortably.
Rolling carts offer incredible mobility for your creative space. Another individual shared her favorite solution: “I use a rolling file cart spray painted white with baskets for current paper projects. I love how it rolls out of the way and moves around the room with me.”
These mobile units keep supplies within reach wherever you’re working. They tuck away neatly when not in use, maximizing your available space.
| Furniture Type | Primary Function | Key Advantage | Best For |
|---|---|---|---|
| Adjustable Tables | Height customization | Ergonomic comfort | Mixed project types |
| Rolling Carts | Mobile storage | Follows your work | Current projects |
| Modular Systems | Reconfigurable layout | Adapts to new interests | Evolving craft room needs |
| Tables with Storage | Space efficiency | Supplies within reach | Frequent tool access |
Flexible furniture ensures your craft room remains functional through every creative evolution. The right pieces support both individual work and collaborative sessions effortlessly.
Enhancing Your Space with Smart Lighting and Power Solutions
The right lighting can transform your creative area from a simple workspace into an inspiring sanctuary. It reduces eye strain and makes colors pop accurately. Good illumination is a game-changer for any project.
Thoughtful power management keeps your tools charged and ready. It also eliminates the tripping hazard of loose cords. A well-lit, powered-up space is both efficient and safe.
Under-Cabinet and Adjustable Lighting Ideas
Strategic lighting makes a huge difference. One enthusiast shared her success:
“I added under-shelf lighting beneath the fabric shelves, and installed it myself! Plus, it has a remote control. This lighting makes a noticeable difference. Work surfaces are well-lit, materials are easy to see, and detailed projects feel less tiring.”
This direct light eliminates shadows on your work surface. It ensures you see true colors when selecting materials.
Clip-on lights offer fantastic flexibility. They can brighten a space evenly. Many models feature cool and warm white settings.
You can customize the light for different tasks. Cool white is perfect for detailed work. Warm white creates a more relaxed atmosphere. Exploring smart home office lighting ideas can provide great inspiration for your own setup.
Managing Power and Cable Organization
Keep power where you need it most. Clip-on power strips are a brilliant solution. You can attach one to each work area.
This means you can charge a laptop or phone right where you work. You never have to stretch cords across walkways.
Simple magnetic cable clips keep cords neat and untangled. This maintains a clean and safe environment. A well-organized power plan is key for modern multifunctional living spaces.
These small upgrades have a big impact. They make your area functional and welcoming at any time of day. You can focus on your project, not on finding light or an outlet.
Integrating Technology and Tools for Efficiency
Modern technology can transform your creative workflow from frustrating to fluid with just a few smart additions. The right tools don’t just save time—they make your entire experience more enjoyable. Thoughtful tech integration turns your space into a truly efficient environment.
One enthusiast shared her favorite affordable upgrade: “I bought a wireless mini Bluetooth speaker for under $25, but it fills the craft room with music while I work, and I use it every single day.” This simple addition creates a motivating atmosphere without complicated setups.
Using Adjustable Workstations and Rolling Carts
The Create Room DreamStation demonstrates how electronic controls enhance workflow. Its sewing machine rises with a button push, then lowers for a flat surface. This seamless transition between tasks eliminates constant setup.
Rolling carts bring supplies to you instead of you going to them. They keep current project materials mobile and accessible. This approach saves significant time during long sessions.
Background entertainment like a TV playing familiar shows creates relaxed focus. One person notes her large screen usually displays Project Runway reruns. Since she’s seen every episode multiple times, it provides perfect ambient entertainment.
Label makers are underrated technology tools that dramatically improve organization. Clearly marked containers ensure everything has its proper home. Family members also know where things belong.
Digital cutting machines and heat presses deserve dedicated stations with nearby storage. Keep their specific accessories within reach for efficient use. The goal is simplifying your process, not complicating it.
Maintaining Your Organized Craft Space
The true test of any well-designed creative space comes after the initial setup, when daily use reveals whether your systems truly work. The goal isn’t perfection but sustainable habits that keep your area functional.
One enthusiast perfectly captured the ideal outcome:
“It is no longer something I have to manage. It works for me.”
This reflects the ultimate success of goodroom organization.
Daily Routines for Keeping Order
Simple habits make all the difference. Spend just five minutes after each session returning supplies to their homes. This small step prevents overwhelming cleanup later.
The “one in, one out” rule helps control accumulation. When new materials arrive, consider donating similar items. This approach maintains balance in your creative environment.
Well-designed systems make maintenance nearly effortless. Putting things away should be as easy as taking them out. This is the secret to long-term success with any organized craft area.
Designate specific spots for works in progress. Bins or trays keep current projects tidy without complete teardown. This saves valuable creative time between sessions.
Adding Personal Style and Finishing Touches
The final layer of personal expression transforms a functional area into your creative sanctuary. This is where utility meets personality, creating a space that truly reflects who you are.
One enthusiast shared her approach:
“My room is functional and beautiful, designed for real-life crafting.”
She changed ribbon colors to match her preferred palette and incorporated sentimental pieces like a paint brush vase from twelve years ago.
Fresh flowers and decorative lighting add life to the environment. These elements soften utilitarian storage systems while bringing genuine joy to your workspace.
Consider these decorative approaches for different effects:
| Element Type | Primary Benefit | Implementation Tip | Visual Impact |
|---|---|---|---|
| Color Coordination | Creates visual harmony | Match storage containers to wall color | Professional, intentional look |
| Sentimental Pieces | Adds personal character | Display vintage finds with history | Warm, inviting atmosphere |
| Decorative Labels | Combines function with style | Use hand-lettered or printed designs | Organized yet artistic appearance |
| Area Rugs | Defines spaces comfortably | Choose patterns that inspire creativity | Finished, welcoming feel |
Every decorative choice should serve a purpose or spark happiness. The best finishing touches balance beauty with practical function in your creative environment.
Conclusion
Transforming your creative area into an efficient workspace brings a sense of accomplishment that lasts for years. This project was deeply satisfying because every choice was intentional. The result is a beautiful, functional place designed for real creating.
If you’ve considered reorganizing, let this inspire you. Build a setup that supports your workflow and brings joy. The investment of time pays off in daily efficiency.
Your space should reflect who you are today. Let go of old supplies that no longer serve your current passions. This liberation makes room for what truly matters.
Start with one small area today. Build momentum from that first success. May your newly arranged area become a sanctuary where inspiration flows freely.


