Thinking about adding a boundary to your property? Many people consider building their own enclosure as a way to enhance their outdoor space. This guide offers a honest look at what this undertaking truly involves.
More property owners are exploring do-it-yourself options to save money and add personal value to their homes. Taking on this kind of work yourself can be rewarding, but it’s important to understand both the advantages and the challenges from the start.
We’ll walk you through the entire process in this comprehensive resource. You’ll learn about planning your layout, choosing the right materials, and different construction methods. We cover traditional techniques as well as newer, simpler approaches like no-dig systems.
Our goal is to empower you with clear information so you can decide if this is the right project for your skills and available time. While it requires dedication, building your own property boundary is an achievable goal for motivated individuals with proper guidance.
This assessment sets realistic expectations about the commitment involved. You’ll discover what tools you’ll need, how much time to budget, and when it might make sense to call in professionals instead.
Key Takeaways
- This guide provides a balanced view of building your own property enclosure
- Many homeowners choose this project to save money and add value
- We cover both benefits and challenges of doing the work yourself
- The content includes planning, materials, and construction methods
- Traditional and no-dig approaches are both discussed
- Realistic time and effort expectations are established upfront
- The goal is to help you make an informed decision about your project
Getting Started with Your DIY Fence Project
A well-planned enclosure transforms your yard into a private sanctuary while boosting your home’s appeal. Before grabbing your tools, it’s essential to understand what this enhancement can truly offer your property.
Understanding the Benefits of Adding a Fence
Your outdoor space gains immediate advantages with proper boundaries. Privacy becomes a reality, creating a peaceful retreat from neighborhood activity. Security improves as your enclosure keeps pets safe and deters unwanted visitors.
The right design elevates your home’s curb appeal significantly. It can hide unsightly utility boxes while defining your landscape beautifully. Increased property value is another compelling benefit that makes this investment worthwhile.
“A quality boundary provides both function and beauty, making outdoor living more enjoyable.”
Overview of the DIY Approach
Many homeowners choose the hands-on route for their perimeter project. This approach offers substantial cost savings compared to professional services. You gain complete control over materials, design, and timeline.
Success requires realistic planning about time commitment and skill level. While challenging, the personal satisfaction of building your own boundary is incredibly rewarding. Proper preparation ensures your project meets both practical and aesthetic goals.
Planning and Preparing Your Fence Installation DIY Project
Before breaking ground on your perimeter enhancement, thorough preparation ensures legal compliance and neighborly harmony. This phase prevents costly mistakes and establishes a clear roadmap for success.
Checking Property Lines and Local Regulations
Start by verifying your exact property line using your home’s plat map. This official document shows boundaries and measurements. You can obtain a copy from your county clerk if needed.
Research local building codes that may restrict height or materials. Many municipalities limit structures to six feet. Contact your homeowners association for specific requirements about colors and placement.
Call 811 to mark underground utilities before any digging. This free service protects you from hitting gas lines or electrical cables. Markings typically appear within three to four days.
Budgeting and Setting Project Goals
Establish a realistic budget that includes materials, permits, and unexpected costs. Consider tool rentals if you don’t own necessary equipment. Sticking to your financial plan prevents overspending.
Define clear objectives for your project. Determine whether privacy, security, or aesthetics drive your decisions. This clarity guides material choices and design elements.
| Planning Consideration | Purpose | Typical Timeline |
|---|---|---|
| Property Line Verification | Ensure legal placement | 1-2 weeks |
| Utility Marking (811) | Safety prevention | 3-4 days |
| HOA Approval | Compliance with rules | 1-3 weeks |
| Permit Acquisition | Legal authorization | 2-4 weeks |
Communicate plans with neighbors to maintain positive relationships. Discussing your project prevents disputes over views or property access. Good communication builds community trust.
Selecting the Right Fence Type and Materials
The selection process for your boundary project involves balancing aesthetics, durability, and effort. Your choices will determine both the final look and the work required.
Comparing Traditional and No Dig Fencing Methods
Traditional fencing requires digging holes and setting posts in concrete. This labor-intensive approach can take several days due to drying time.
No-dig systems offer a faster alternative. You can complete this type of project in a weekend without excavation work. Both methods create durable boundaries for your property.
Choosing Materials: Wood, Vinyl, Metal, and More
Wood remains a popular choice, especially cedar for its natural resistance to weather. It offers classic beauty but requires regular maintenance.
Vinyl provides low-maintenance fencing with consistent color. Metal and aluminum options deliver modern style with excellent durability.
Prefabricated panels simplify the planning process. The style you choose determines available panel widths for your layout.
Essential Tools and Materials for Fence Installation
Having the right gear on hand makes your property enclosure project more efficient and less stressful. Proper preparation ensures you won’t face frustrating delays once work begins.
Must-Have Tools for a Successful Installation
Traditional methods require several essential tools. You’ll need a post hole digger for setting sturdy foundations. A reliable hammer and power drill are crucial for assembly.
Don’t forget a quality level to keep everything straight. For no-dig systems, the tool list shrinks dramatically. A sledge hammer and rubber mallet handle most tasks.
Materials List and How to Save on Supplies
Your materials selection depends on the method you choose. Traditional builds need 4×4 posts and appropriate concrete for stability. Various screws secure rails and pickets effectively.
Consider renting expensive equipment like gas-powered augers. This approach saves money for one-time projects. Calculate quantities carefully to minimize waste and extra costs.
Quality materials like cedar posts offer better longevity. They may cost more initially but reduce maintenance over time.
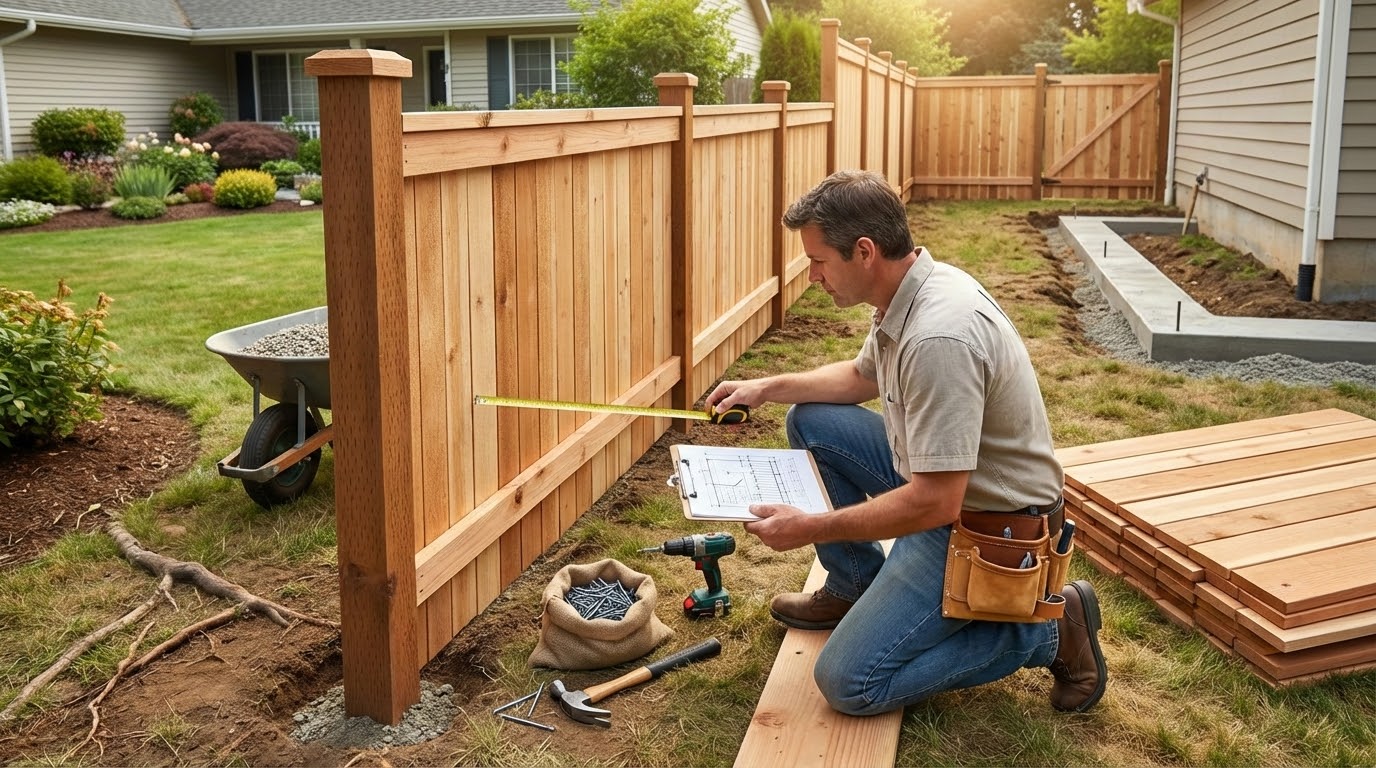
Step-by-Step Process: Installing Your Fence
The construction phase begins with precise measurements to ensure your property line is perfectly defined. This first step lays the foundation for everything that follows.
Measuring, Marking, and Digging Post Holes
Start by measuring your entire boundary line. Include gate locations in your calculations. Use a measuring wheel for accuracy on longer runs.
Mark the ground with spray paint or chalk. This visual guide keeps your work on track. Subtract gate lengths from total footage to determine panel quantities.
Calculate how many posts you’ll need. Space them every 6 to 8 feet for optimal stability. Dig holes about one-third the height of your posts.
Assembling Panels, Posts, and Gates
Set posts with gravel for drainage and concrete for strength. Use a level to ensure they stand perfectly straight. Allow concrete to cure completely before continuing.
Attach rails securely using appropriate screws. Privacy structures typically need three rails. Prefabricated panels save time compared to individual pickets.
| Construction Phase | Key Tools Needed | Time Estimate |
|---|---|---|
| Measuring & Marking | Measuring wheel, spray paint | 1-2 hours |
| Digging Holes | Post hole digger, shovel | 3-4 hours |
| Setting Posts | Level, concrete mix | 2-3 hours |
| Assembly | Drill, screws, hammer | 4-6 hours |
Understanding No Dig Fencing: Pros and Cons
For those seeking a less disruptive way to establish property lines, no-dig options deserve consideration. This modern approach to fencing offers distinct advantages while having specific limitations worth understanding.
Key Benefits for Homeowners
No-dig systems provide remarkable time savings. You can complete the project in about half the time of traditional methods. The process involves driving stakes into the ground and connecting panels through simple eyelets.
Your landscape remains undisturbed throughout the process. There’s no excavation work or concrete mixing required. This fencing approach protects your lawn from holes and dirt mounds.
The modular design offers excellent flexibility. If you relocate, your boundary system can move with you. Panels disconnect easily since there are no permanent concrete foundations.
Limitations to Consider Before Installing
These systems serve primarily decorative purposes. Maximum height typically reaches only four feet, limiting privacy applications. They’re not designed for containing large pets.
Sloped properties present challenges for no-dig fencing. Significant inclines may require traditional methods instead. The system works best on relatively level ground.
| Advantage | Consideration | Best For |
|---|---|---|
| Fast installation | Limited height options | Garden borders |
| Landscape preservation | Decorative function | Pool safety |
| Portable design | Slope limitations | Temporary boundaries |
| Cost effective | Pet containment issues | Walkway definition |
Carefully weigh these factors against your specific needs. No-dig fencing offers an excellent solution for many situations, but traditional methods might better serve certain requirements.
Fence Installation DIY: Practical Tips for a Successful Build
Seasoned builders know that efficiency isn’t about working harder, but working smarter with the right methods. These professional tips can transform your outdoor project from frustrating to fulfilling.
Expert Tricks to Streamline Your Project
Before starting any physical work, lay all panels and posts on the ground in their planned order. This simple step keeps you organized throughout the entire process. It prevents confusion and saves valuable time.
For accurate stake placement, slide a post through a panel eyelet to mark the next position. This clever trick eliminates constant measuring. You’ll see exactly where each component belongs.
When working alone, use clamps to hold rails securely in position. This makes assembly manageable without a helper. Proper equipment choices also speed up your work significantly.
Always make sure you have all materials on-site before beginning. Measure twice to minimize hardware store trips mid-project. These preparation tips ensure a smooth workflow.
Don’t overlook finishing details like post caps for weather protection. They add both function and polish to your final result. These expert tips will help your DIY fence installation succeed.
Optimizing Your Fence for Privacy, Security, and Style
The final touches on your property enclosure make all the difference between basic and beautiful. Your boundary should reflect your home’s character while serving practical needs. Thoughtful design choices enhance both security and visual appeal.
Consider how your structure complements your home’s architecture. The right style creates harmony with your property’s overall look. This attention to detail boosts curb appeal significantly.
Enhancing Curb Appeal and Functionality
Choose materials and colors that harmonize with your home’s exterior. Solid panels offer maximum privacy for your yard. Taller designs provide better security when local codes allow.
Strategic placement protects views while creating intimate outdoor spaces. Your boundary becomes an extension of your living area. Explore creative privacy fence ideas for inspiration.
Incorporating Gates and Decorative Elements
Gate placement affects your yard’s flow and accessibility. Use steel reinforcement kits to prevent sagging over time. Proper hardware installation ensures smooth operation for years.
Add decorative post caps and trim boards along the top. These elements protect against weather while adding personality. X-patterns on gates create visual interest without compromising strength.
Finish with quality stains that resist sun damage. Your investment will maintain its beauty through changing seasons. A well-designed gate enhances both security and style.
Conclusion
With the knowledge you’ve gained, you’re now equipped to make confident choices about your property enhancement. This guide has prepared you to assess whether this project matches your skills and available time.
Remember that successful outcomes begin with thorough preparation. You’ll need to research local regulations and verify property boundaries before starting. Choosing between traditional and modern methods depends on your specific goals and landscape.
The diy approach offers rewarding benefits beyond cost savings. You gain complete control over materials and design. Your finished fence installation will reflect your personal style while adding value to your home.
Whether you tackle this project yourself or hire professionals, proper planning ensures excellent results. Your investment of time and effort will create a beautiful, functional space you can enjoy for years.


