Welcome to your guide on one of the most impactful home improvement projects you can tackle. Choosing between doing it yourself or hiring a pro for your cabinet setup is a big decision. This choice can transform your cooking space and significantly impact your budget.
This comprehensive guide provides all the information you need to make a confident choice. We’ll walk you through every step, from initial planning to the final touches. You’ll understand exactly what’s involved in this advanced do-it-yourself job.
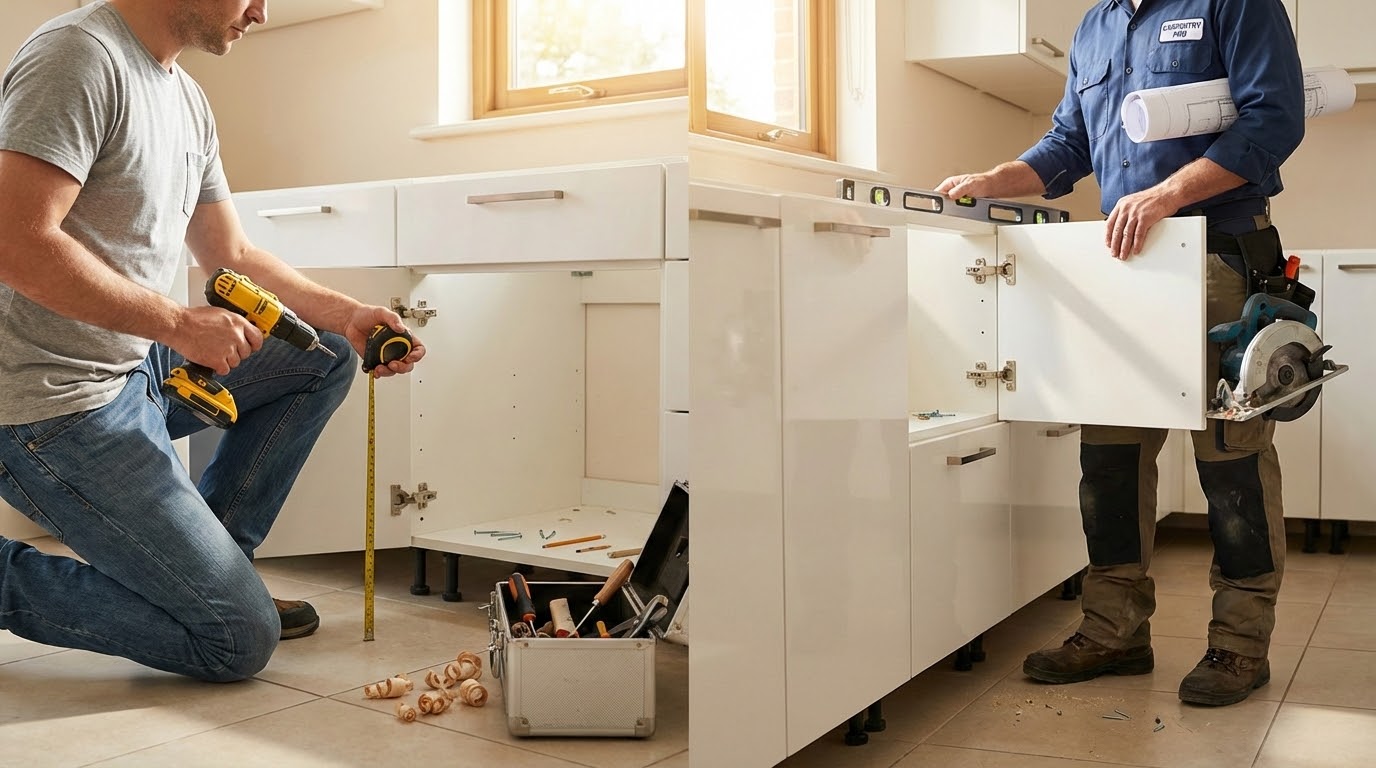
While this project requires careful planning and precision, it’s definitely achievable for dedicated homeowners. Success comes from following a systematic process rather than relying on raw strength. Having a helper makes positioning upper units much safer and easier.
The time commitment typically runs 8-10 hours for an average-sized room. You’ll need moderate carpentry skills and standard tools. The potential cost savings of doing it yourself are substantial compared to professional labor rates.
Even if you’ve never handled this type of work before, our guide will help you achieve professional-looking results that last for years. Let’s explore whether the DIY route or hiring an expert is right for your situation.
Key Takeaways
- This is an advanced DIY project that requires careful planning and precision
- Moderate carpentry skills and standard tools are needed for success
- Time commitment averages 8-10 hours for an average-sized space
- Having a helper is recommended for safety when handling upper units
- Substantial cost savings are possible with the do-it-yourself approach
- Professional-looking results are achievable with proper guidance
- The decision depends on your skill level, time availability, and budget
Understanding the Kitchen Cabinet Installation Process
Before deciding whether to tackle this project yourself or hire help, it’s crucial to grasp what the work actually entails. The process involves mounting storage units to walls in a specific sequence while ensuring perfect alignment.
DIY vs Professional: Which Option Suits Your Project?
Taking the do-it-yourself route can save significant money on labor costs. Professionals typically charge $80-$190 per unit. However, this approach demands patience, time, and moderate carpentry skills.
Hiring experts brings speed and guaranteed expertise to your project. They handle the physical demands and precision work efficiently. This eliminates potential frustration from alignment issues.
Key Phases in the Installation Journey
The work follows a logical sequence where each phase builds upon the previous one. Proper planning eliminates most problems before they arise. Having a helper makes handling upper units much safer.
| Phase | Description | Purpose | Time Required |
|---|---|---|---|
| Preparation & Layout | Creating accurate guidelines and marks | Establish foundation for alignment | 2-3 hours |
| Hanging Upper Units | Securing wall-mounted storage starting from corners | Create overhead storage space | 3-4 hours |
| Setting Base Units | Leveling and securing floor-standing components | Establish primary work surfaces | 2-3 hours |
| Finishing Touches | Adding doors, hardware, and trim elements | Achieve polished final appearance | 1-2 hours |
Success depends on understanding this sequential approach. Each step creates the foundation for professional-quality results that will last for years.
Essential Tools and Materials for Cabinet Assembly
Having the right equipment ready makes your cabinet project go from frustrating to fantastic. Proper preparation prevents those annoying mid-project hardware store runs.
Gathering everything beforehand ensures a smooth workflow. This approach saves time and reduces stress during the assembly process.
Must-Have Tools for a Successful Install
Start with measuring and leveling tools. A quality tape measure and six-foot level are crucial for accuracy. These tools help achieve professional-looking results.
Power tools make the work easier. A cordless drill drives screws efficiently. An impact driver provides extra torque for tough jobs.
Don’t forget a stud finder for secure wall mounting. Special washer-head screws offer the best holding power. They distribute pressure evenly across the cabinet frame.
Safety Gear and Additional Supplies
Safety should always come first. A sturdy ladder provides stable access to upper units. Clamps hold pieces together during joining.
Wood shims help with leveling and filling gaps. They compensate for uneven walls and floors. Having various sizes on hand is smart.
Investing in quality tools pays off through easier work and better results. Some specialized items might require renting or purchasing.
Pre-Installation Preparation and Accurate Layout
The foundation of any successful storage unit project begins long before the first screw is driven. Proper preparation separates frustrating installations from professional results that last for years.
Evaluating Wall and Floor Conditions
Start by assessing your room’s surfaces using a 4-foot level and straight 2×4 board. Check if walls are plumb and corners form perfect 90-degree angles.
Note any irregularities like dips or bows that may require shimming. These imperfections can twist your units if not addressed beforehand.
Identify the floor’s high point using an 8-foot 2×4 with a level on top. Shim the low end until level, then mark where the floor is highest. This becomes your critical reference mark.
Creating Level Layout Lines for Precision
Establish horizontal reference lines about 48 inches from the floor using a level. Snap chalk lines around the room at this height.
Measure from these lines down to the floor in several spots. The shortest measurement indicates your high point. These layout lines ensure everything hangs straight regardless of uneven surfaces.
| Preparation Phase | Tools Needed | Purpose | Time Required |
|---|---|---|---|
| Surface Evaluation | 4-foot level, 2×4 board | Identify irregularities | 30-45 minutes |
| High Point Location | 8-foot 2×4, carpenter’s level | Establish reference point | 20-30 minutes |
| Layout Line Creation | Chalk line, measuring tape | Set alignment guides | 15-25 minutes |
This meticulous preparation ensures your cabinet installation proceeds smoothly. While it feels tedious, this work prevents alignment headaches later.
Measuring, Marking, and Locating Studs
Precise measurements and markings form the backbone of a secure cabinet installation. This critical phase ensures your storage units mount safely to wall studs rather than just drywall.
Using a Stud Finder Effectively
Start by calibrating your stud finder on a clear wall section. Move the device slowly until it indicates a stud’s edge. Mark the center point with a light pencil line.
Extend this mark vertically using a carpenter’s level. This creates a clear guide across your layout lines. For freshly painted walls, use painter’s tape instead of pencil marks.
Drill small confirmation holes to verify stud locations before proceeding. This extra step prevents misplaced mounting screws.
Marking the High Point on the Floor
Locate your floor’s highest point using previously established methods. Measure 34 inches upward from this spot to mark base cabinet height.
Extend a level line around the room at this height. This reference ensures all base units install at consistent elevation.
| Marking Type | Tool Required | Purpose | Accuracy Check |
|---|---|---|---|
| Stud Locations | Stud finder, level | Secure mounting points | Confirmation drilling |
| Vertical Lines | Carpenter’s level | Alignment guide | Plumb verification |
| Height Reference | Tape measure | Consistent elevation | Level testing |
| Pilot Holes | Drill with small bit | Easy screw placement | Depth measurement |
Transfer these markings to your cabinet backs before drilling pilot holes. This preparation makes the final attachment process smooth and precise.
Assembling and Inspecting Your Kitchen Cabinets
Your new cabinets have arrived – now comes the crucial unpacking and inspection phase. This step ensures everything is correct before you begin the physical work.
Thorough checking at this stage prevents major headaches later. It’s much easier to address issues now than after everything is mounted.
Inspecting Cabinets Upon Delivery and During Assembly
Open all packaging immediately when your shipment arrives. Verify each piece matches your order for size, color, and style.
Check pre-assembled units to confirm all parts are properly attached. Look carefully for any shipping damage to boxes, shelves, and fronts.
Count all hardware components like hinges and drawer glides. Make sure trim pieces and filler strips are included if ordered.
Contact your supplier promptly about any missing or damaged items. Most companies quickly replace components when notified early.
For ready-to-assemble (RTA) cabinets, assembly comes first. Your initial unit might take 35-40 minutes as you learn the system.
Subsequent cabinets typically assemble in 15-20 minutes each. Work in an organized space and follow manufacturer instructions carefully.
Ensure each cabinet is square and solid before proceeding. Starting with properly assembled, undamaged cabinets is foundational to professional results.
Installing Upper Wall Cabinets
Professional results begin with understanding why experienced installers tackle upper units first. This approach provides clear workspace without base units getting in your way. You’ll appreciate the extra room when positioning these overhead storage solutions.
Starting in a corner makes perfect sense. This is where two cabinet runs typically meet. Begin here for the best alignment throughout your project.
Setting Up a Ledger Board for Support
A temporary ledger board transforms this challenging task. This straight 1×3 or 1×4 board screws to the wall just below your layout line. It acts as a sturdy shelf during the process.
Secure the board using 2-inch drywall screws into every other stud. This support system holds the full weight of each unit. Now you can focus on perfect positioning rather than heavy lifting.
Remove doors before starting to make cabinets lighter. Label them with masking tape for easy reattachment later. This simple step makes handling much easier.
Ensuring Cabinets are Plumb and Level
With help or a cabinet jack, lift the first unit onto the ledger board. Check the cabinet face with a level to ensure it’s perfectly plumb. Vertical alignment is crucial for professional results.
If the unit isn’t plumb against the wall, use thin wood shims. Slide these between the cabinet back and wall at stud locations. This creates the spacing needed for perfect alignment.
Drive 2½-inch deck screws with washers through the mounting rail into studs. Use at least two screws per stud for maximum security. Leave screws slightly loose for final adjustments.
Only fully tighten all fasteners after joining adjacent cabinets together. This allows for minor tweaks to achieve seamless alignment across your entire run.
DIY Kitchen Cabinet Installation: A Step-by-Step Approach
With your corner unit securely in place, the real artistry begins as you expand your installation across the wall. This phase transforms individual pieces into a cohesive storage system.
Step-by-Step Guide to Hanging Cabinets
Lift the next unit onto your ledger board support. Position it carefully beside the first cabinet. Use C-clamps to temporarily join the two units together.
Align the face frames perfectly flush before any permanent fastening. Check alignment with a straightedge across both fronts. This creates the seamless appearance professionals achieve.
Drill pilot holes through the face frame stiles using a 3/32-inch bit. Create three connection points: top, middle, and bottom. Drive 2½-inch #8 screws to permanently connect the units.
| Step | Tool Required | Purpose | Key Tip |
|---|---|---|---|
| Positioning | Ledger board | Secure temporary support | Rest units evenly |
| Alignment | C-clamps, straightedge | Perfect flush joining | Check from multiple angles |
| Fastening | Drill, 3/32″ bit | Permanent connection | Countersink screws evenly |
| Securing | 2½” #8 screws | Strong structural bond | Three points per cabinet |
Tips for Overcoming Common Installation Challenges
Walls often aren’t perfectly straight. Use wood shims at stud locations to compensate for irregularities. Insert shims between the unit back and wall surface.
Never fully tighten wall-mounting screws until all cabinets in a run are joined together. This flexibility allows final adjustments for perfect alignment.
Step back periodically to view your work from a distance. Catch alignment issues early when corrections are easier. Maintain consistent reveals between units for professional results.
The secret to flawless cabinet installation lies in the patience of temporary connections before final commitment.
Securing Base Cabinets and Ensuring Level Installation
Working with base cabinets requires different techniques than wall-mounted units. These floor-level components form the critical foundation for your countertops. Proper setup ensures long-term stability and prevents future problems.
Dry-Fitting and Positioning Cabinets Accurately
Begin by dry-fitting all base cabinet boxes in their planned positions. Start with the corner unit and work outward. This trial run confirms your layout matches the design.
Remember that face frames extend beyond the cabinet box on each side. When frames meet, a natural space appears at the back. Maintain this spacing when marking wall positions.
Joining Cabinets for a Seamless Look
Move your corner base cabinet into final position. Shim it up from the floor until the top edge meets your layout line. Check that the face is perfectly plumb using a level.
Add shims underneath or behind the unit at stud locations as needed. Work outward from the corner, ensuring each subsequent cabinet aligns perfectly.
| Leveling Method | Tool Required | Purpose | Pro Tip |
|---|---|---|---|
| Floor Shiming | Wood shims | Raise to layout line | Start from high point |
| Wall Adjustment | Thin shims | Plumb alignment | Use at stud locations |
| Face Frame Check | Carpenter’s level | Vertical verification | Check both directions |
| Top Leveling | Long level | Surface consistency | Verify across entire run |
Clamp adjacent units together before permanent fastening. Ensure face frames sit perfectly flush. This attention to detail creates the seamless look professionals achieve.
Constant level checks prevent problems when countertops are installed later. Even slight deviations can cause significant issues down the line.
Adjusting Drawers, Doors, and Hardware
The final transformation from functional storage to beautiful furniture happens during the hardware and adjustment phase. This meticulous work elevates your project from basic to professional-grade results.
Perfect alignment creates that seamless, custom-built appearance. Take your time with these finishing touches for outstanding outcomes.
Aligning Drawer Fronts and Doors
Begin by checking all drawer fronts from directly facing the units. Viewing them head-on reveals subtle misalignments.
To adjust drawers, loosen the screws holding the glides to the frame. Move the drawer vertically until perfectly level with adjacent fronts.
Re-tighten the screws securely. Drill a 1/8-inch pilot hole through the second hole below each glide. Drive a 5/8-inch, #8 screw for added stability.
Modern hinges offer three-way adjustability for perfect door placement. This flexibility allows complete control over positioning.
Drilling for Handles and Precise Hardware Placement
Measure twice before drilling any holes for hardware. Consistent placement across all doors creates uniform appearance.
Use a template or jig for perfect handle alignment. Drill 1/8-inch pilot holes to prevent wood splitting.
Secure handles with 5/8-inch, #8 screws. This attention to detail separates amateur work from professional results.
| Adjustment Type | Tool Needed | Purpose | Pro Tip |
|---|---|---|---|
| Vertical Door Alignment | Phillips screwdriver | Up/down positioning | Loosen hinge plate screws |
| Horizontal Gap Control | Adjustment tool | Side-to-side movement | Turn main hinge screw |
| Depth Adjustment | Hex key | Flush mounting | Use rear hinge screw |
| Drawer Leveling | Drill, level | Front alignment | Check from multiple angles |
Great craftsmanship isn’t about never making adjustments—it’s about having the patience to make them perfectly.
Aim for consistent 1/8-inch gaps around every door and drawer front. Step back frequently to assess your progress from a distance.
Small, incremental tweaks yield the best results. Your patience during this phase pays off with stunning, professional-looking storage solutions.
Adding Finishing Touches and Molding for a Polished Look
The magic happens when you add those final details that elevate your project from basic to beautiful. These elements transform functional storage into a cohesive, custom-built appearance that looks professionally done.
Patience during this phase pays off with stunning results that add significant value to your space. The right trim work creates that seamless, built-in look everyone desires.
Choosing the Right Trim, Crown, and Toe Kicks
Start with the toe kick trim at the bottom of your base cabinets. Use 1-inch brad nails to secure the longest pieces first. Then cut shorter sections to complete the run.
For gaps between floor and trim, you have two options. Scribe the trim to match the floor profile. Or add shoe molding nailed to the floor for a clean finish.
Crown molding adds elegance to upper cabinets. Miter outside corners for clean joints. Cope inside corners for professional results.
Align the molding’s bottom edge with a level line marked above the doors. This ensures consistent placement around the room.
Final Alignment and Secure Fastening
Fasten crown molding with 1- to 2-inch finish nails into the cabinet top. Glue the end joints for extra strength. Recess all nail heads below the surface.
Use wood putty or color-matched wax to hide fastener marks. This creates that smooth, finished appearance.
Filler strips close gaps between cabinets and walls. Measure the widest part of any gap first. Cut your strip to fit this measurement.
You’ll often need to scribe a slight angle against uneven walls. Secure the strip from inside the adjacent cabinet for invisible fastening.
This approach creates that perfect, built-in look where everything appears seamlessly integrated. Your attention to these details makes all the difference.
Managing Costs, Time, and Project Challenges
The success of your storage setup depends heavily on how well you manage the budget, timeline, and unexpected obstacles. Smart planning prevents frustration and ensures professional results.
Budgeting and Overcoming Common Installation Hurdles
Professional labor typically costs $80-$190 per unit. DIY materials run $100-$200 per linear foot. This shows significant savings for those willing to do the work.
Quality tools make the job easier and ensure better outcomes. They can be used for future projects too. Basic tools may already be in your garage.
| Cost Factor | DIY Approach | Professional Service | Key Consideration |
|---|---|---|---|
| Labor Expenses | Your time only | $80-$190 per unit | Skill level matters |
| Material Costs | $100-$200/linear foot | Included in quote | Quality varies widely |
| Tool Investment | Purchase/rent as needed | Contractor provides | Long-term value |
| Time Commitment | 8-10 hours average | 1-2 days typically | Experience affects speed |
Common challenges include uneven walls and plumbing obstacles. Use thin wood shims at stud locations to compensate for wall irregularities. For detailed budget planning guidance, consider professional resources.
Flooring installation should typically come first, especially with floating floors. This creates a cleaner finish and prevents future issues. Proper preparation solves most problems before they start.
Conclusion
The journey from planning to completion of your storage project brings immense satisfaction. With methodical preparation and attention to detail, this challenging task becomes absolutely achievable.
Remember that precision and patience matter more than speed. Always double-check measurements and stud positions. Having a helper makes the physical work safer and easier.
Even professionals face challenges with uneven surfaces. Using shims and making adjustments are normal parts of any home improvement job. The skills you learn—measuring, leveling, and finishing—will serve you well in future projects.
If the work feels overwhelming at any point, consulting an expert ensures your investment is protected. Completing this transformation yourself saves significant costs while giving you complete control over quality and timeline.


