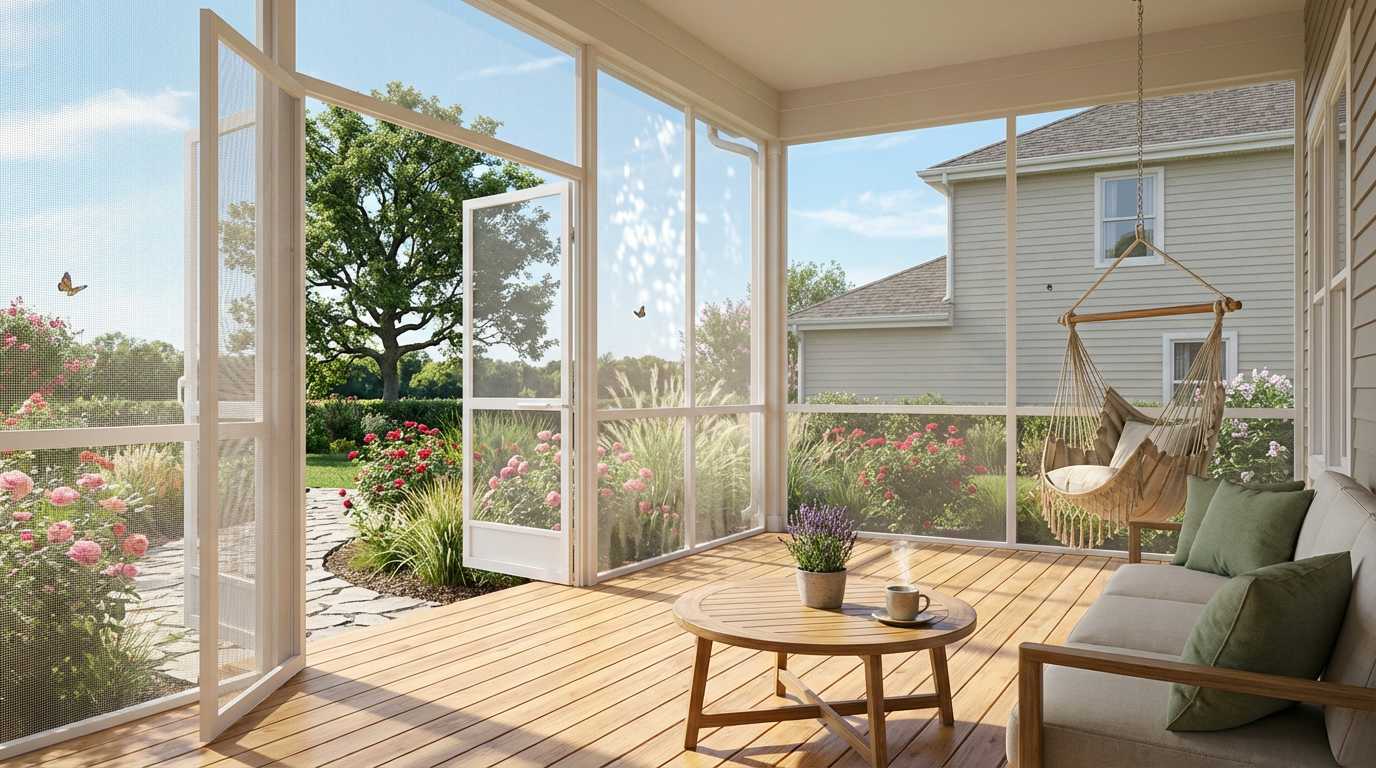
Welcome to your complete guide on creating the perfect outdoor retreat. Imagine having a comfortable area where you can relax without worrying about pesky insects or weather changes. This type of home improvement brings the beauty of nature right to your doorstep.
Many families are looking for ways to expand their living areas. They want to blend indoor comfort with outdoor freshness. A well-designed structure provides the ideal solution for enjoying your property to the fullest.
Recent years have shown us how valuable our homes can be. People now seek functional areas that offer protection and pleasure. You get relief from bugs, pollen, and unexpected rain while still feeling connected to the outdoors.
This guide walks you through every step of the process. We cover planning, design choices, material options, budgeting, and maintenance. Whether you’re a DIY enthusiast or planning to hire experts, you’ll find the information you need to make smart decisions.
Key Takeaways
- Create a comfortable outdoor living area free from insects and weather concerns
- Bridge the gap between indoor comfort and natural outdoor beauty
- Increase your home’s functional space and overall enjoyment
- Protect against bugs, pollen, and light rain while maintaining fresh air flow
- Plan carefully with design, materials, and budget considerations
- Suitable for both DIY projects and professional installations
- Enhance your property’s value and your quality of life
Understanding the Screened-In Porch Concept
What exactly defines this versatile structure that combines the best of indoor and outdoor living? This home feature creates a unique transitional space that protects you from nature’s nuisances while maintaining that fresh air connection.
Definition and Purpose
A screened-in porch is essentially an outdoor living area enclosed with fine mesh material. The screens serve as a barrier against insects and debris while allowing natural breezes and sunlight to flow through.
The primary purpose is creating a protected zone where families can enjoy nature’s benefits without the annoyances. You get relief from mosquitoes, pollen, and light rain while still feeling connected to your yard.
It’s helpful to understand the terminology differences between various structures. Unlike fully enclosed decks, these spaces maintain stronger outdoor connections.
Benefits of a Screened-In Space
The advantages of this design are substantial. You gain extended usable time outdoors throughout warmer months. Allergy sufferers appreciate the reduced pollen exposure.
This type of porch creates a comfortable transition between your home and nature. It serves multiple functions from dining areas to quiet reading nooks. The space adds valuable square footage without the expense of a full room addition.
You can install these structures on various home levels. Ground-floor installations offer easy access. Second-story designs provide elevated views of your property.
Planning Your Outdoor Retreat
The success of your new outdoor space begins with thoughtful planning. Careful preparation ensures your vision aligns with practical realities. This stage helps avoid costly mistakes later in the process.
Consider how the structure will connect to your existing home. Think about traffic flow and daily usage patterns. Proper planning creates a seamless transition between indoor and outdoor areas.
Design Considerations
Your outdoor room should complement your home’s architectural style. Choose a design that enhances rather than clashes with your existing aesthetic. This creates visual harmony throughout your property.
Pay special attention to window placement during planning. Avoid blocking existing windows that provide natural light to interior rooms like kitchens. One family chose a 21 x 14.7 foot structure specifically to preserve daylight.
Sizing and Layout
Determine the right size based on your available backyard space and budget. Common dimensions include 12×12 feet (144 sq ft) for compact areas and 14×18 feet (252 sq ft) for more generous layouts. The 21×14.7 foot example provides approximately 310 square feet.
Plan your layout considering furniture placement and movement patterns. Ensure adequate space for dining, lounging, or entertaining activities. Create design renderings to visualize the final result before construction begins.
Think about future needs and flexibility. Your family’s usage may evolve over years. Build in adaptability for changing furniture arrangements or seasonal variations.
Choosing the Right Materials
The longevity and enjoyment of your outdoor living space depend heavily on the materials you select. Quality components ensure your investment stands the test of time while minimizing maintenance demands.
Quality Screens and Framing
Screen selection makes a significant difference in performance and durability. Standard fiberglass screens work well for most applications, while pet-resistant versions offer extra strength. Fine-mesh options provide nearly invisible protection.
For framing, cedar wood represents the premium choice with natural rot resistance. Pressure-treated lumber offers good durability at a moderate cost. Composite materials provide low-maintenance alternatives that never need staining.
Roofing and Flooring Options
Roof design impacts both aesthetics and function. Gable roofs add architectural interest with increased ceiling height. Shed roofs offer simpler construction at lower cost. Matching your home’s existing roof style creates seamless integration.
Flooring decisions balance comfort and protection. Tongue-and-groove pine creates a sealed surface that prevents insects from entering through gaps. Composite decking resists rot, mold, and splinters while requiring minimal upkeep.
Specialized materials like polycarbonate panels can enhance railing areas. These transparent panels block wind-driven rain and dust while maintaining visibility. Upgraded details such as iron balusters offer enhanced durability and refined appearance.
Evaluating Costs and Budgeting
Before breaking ground, establishing a realistic budget helps ensure your vision aligns with practical realities. Understanding the financial investment required prevents surprises and keeps your project on track.
Your total project cost depends on several key factors. The size of your space, material choices, and local labor rates all influence the final price.
Cost Breakdown
Different sized structures come with varying price tags. Smaller designs offer more budget-friendly options while larger spaces provide more room for customization.
| Size | Cost Range | Standard Features | Popular Upgrades |
|---|---|---|---|
| 12×12 feet | $10,000-$20,000 | Basic framing, standard screens | Gable roof (+$340), additional outlets |
| 14×18 feet | $23,000-$24,000 | Quality materials, proper foundation | Arched windows (+$725), T&G flooring |
| 21×14.7 feet | $50,000+ | Premium cedar, custom details | Speaker wiring, gas lines, iron balusters |
Material quality dramatically affects your total project cost. Pressure-treated lumber offers economy while premium cedar provides superior longevity.
Budgeting Tips
Always budget 10-15% extra for unexpected issues. Construction projects often reveal hidden challenges that require additional funds.
Get multiple estimates from different contractors. Compare quotes carefully and ask about included services. Planning during off-peak seasons may yield better rates.
Consider phasing your project to manage expenses. Start with essential features and add upgrades later. This approach spreads costs over time.
Design Inspirations and Style Options
Transforming your protected outdoor area into a personal sanctuary starts with creative vision. Your design choices determine whether this space becomes a cozy reading nook or an entertainment hub for gatherings. The right style transforms basic functionality into your favorite home feature.
Consider how you’ll use this versatile room before selecting aesthetics. Do you need dining space for family meals or comfortable seating for relaxation? Your lifestyle should guide your porch ideas and overall design approach.
Classic Comfort vs. Contemporary Chic
Classic comfort design embraces timeless elements like rocking chairs and warm color palettes. This style creates a welcoming, nostalgic atmosphere perfect for lazy afternoons. Potted plants and cozy blankets complete the inviting look.
Contemporary chic offers clean lines and minimalist decor for sophisticated spaces. Modern furniture pieces and monochromatic schemes create uncluttered, elegant environments. This approach appeals to those preferring sleek, organized areas.
Themed inspirations include tropical getaways with lush greenery or coastal vibes with nautical elements. You might prefer rustic retreats with vintage furniture or Southern charm with bright cushions. Each style creates a distinct mood for your protected enclosure.
Don’t hesitate to mix elements from different design philosophies. Your unique combination should reflect personal tastes while meeting practical needs. This blending creates a truly customized living space that serves your family perfectly.
Incorporating Indoor-Outdoor Living
The magic of indoor-outdoor living happens when your protected outdoor area feels like a natural extension of your home. This design approach transforms how you experience your living spaces.
Thoughtful planning creates continuity between interior rooms and exterior areas. Your outdoor space should flow seamlessly from your main living areas.
Furniture and Decor Selections
Choosing the right furniture makes your outdoor area functional and inviting. Outdoor-rated pieces withstand humidity and temperature changes better than indoor furniture.
Coordinate your decor with adjacent interior rooms for visual harmony. This creates a cohesive look throughout your home.
| Furniture Type | Best Uses | Durability Rating | Maintenance Needs |
|---|---|---|---|
| All-Weather Wicker | Lounge seating, dining sets | Excellent | Low – occasional cleaning |
| Teak Wood | Dining tables, benches | Superior | Medium – occasional oiling |
| Powder-Coated Metal | Bistro sets, accent pieces | Very Good | Low – wipe clean |
| Outdoor Fabric | Cushions, pillows | Good | Medium – store when wet |
Creating a Seamless Flow
Access point design dramatically improves movement between spaces. Replacing standard doors with double French doors creates better visual connection.
Arrange furniture to encourage daily use for multiple activities. Include comfortable seating, dining areas, and work surfaces.
Start with essential furniture pieces and add accessories gradually. This lets you enjoy the space immediately while personalizing over time.
Roof and Ceiling Enhancements
Your choice of roofing and ceiling details can transform the entire character of your space. These overhead elements determine both the visual appeal and practical functionality of your outdoor room.
Comparing Roof Styles
The roof design dramatically affects your space’s appearance and interior feel. Gable roofs create visual interest with additional height, while shed roofs offer simpler construction at lower cost.
One homeowner discovered how ceiling height impacts perception. “We changed from a flat ceiling to one that followed the roof pitch,” they noted. “This simple adjustment made the room feel significantly larger and more open.”
| Roof Type | Cost Impact | Ceiling Height | Best For |
|---|---|---|---|
| Gable Roof | +$340 average | Higher, vaulted | Traditional homes, spacious feel |
| Shed Roof | Standard cost | Consistent height | Modern designs, budget projects |
| Hip Roof | +$500-700 | Varied angles | Complex designs, wind resistance |
Beadboard ceiling finishes add texture and traditional charm. Available in wide or narrow profiles, this material choice enhances the room’s character. White outdoor fans often blend seamlessly with light-colored ceilings.
Structural requirements like hurricane clips ensure safety during severe weather. These connections keep the roof secure during high winds. Proper mounting during construction prevents future issues.
The right overhead design creates an inviting atmosphere while meeting practical needs. Consider all elements from structural integrity to aesthetic appeal when planning your project.
The Construction Process
The physical transformation from concept to completed structure follows a predictable sequence. Understanding each phase helps you prepare for the journey ahead.
Demo, Pour, and Build
Site preparation begins with demolition of existing elements. One homeowner shared their experience: “The concrete took one full day to demo and pour in December.” They expanded the foundation due to cracks in the original slab.
The building work typically starts with framing after foundation completion. Construction follows this logical progression:
| Phase | Duration | Key Activities |
|---|---|---|
| Foundation | 1-2 days | Demolition, concrete pouring |
| Framing | 5-7 days | Structure assembly, roof installation |
| Finishing | 15-20 days | Screening, electrical, painting |
Timelines and Expectations
A typical project requires about 32 actual work days. This translates to 6-8 weeks total time. Crews often work 10-12 hour days to maintain momentum.
Expect surprises during any renovation. One common issue involves discovering hidden damage. Regular communication with your contractor ensures smooth problem resolution.
“When starting a renovation, there will always be surprises. We discovered damaged siding that needed complete replacement.”
Permit inspections may cause brief pauses in the work process. Plan for some daily disruption during active construction periods.
Hiring Professionals vs. DIY
Homeowners face a fundamental decision when embarking on outdoor improvements: tackle the work themselves or hire skilled experts. This choice affects your budget, timeline, and final results.
Advantages of Professional Help
Hiring experienced porch contractors brings significant benefits. They understand local building codes and have established relationships with inspectors. Professionals work efficiently, often completing projects in weeks rather than months.
One homeowner shared their experience: “We saved precious time by hiring professionals. My husband works full-time, and his rest time is better spent actually relaxing.” They appreciated the immediate use of their new space.
| Factor | Professional Approach | DIY Approach | Key Difference |
|---|---|---|---|
| Time Investment | 2-8 weeks | 3-12 months | Professionals work 10-12 hour days |
| Cost Control | Fixed quotes | Variable expenses | DIY mistakes can increase final cost |
| Quality Assurance | Guaranteed work | Skill-dependent | Professionals stand behind their work |
| Permit Process | Handled by contractor | Homeowner responsibility | Local code knowledge is crucial |
Considerations for DIY
If considering DIY, honestly assess your skills and available time. Building a structure requires specific tools and physical capability. Researching building codes and permit requirements adds to the time investment.
Some renovations should always be done by, especially those involving structural elements. Getting multiple estimates provides valuable learning opportunities, as each contractor may suggest new ideas.
The right choice depends on your situation. Professionals offer speed and reliability, while DIY can save money if you have the necessary skills and time.
Enhancing with Custom Details
Custom upgrades transform basic structures into spaces that reflect your unique style. These thoughtful touches elevate both function and appearance of your outdoor area.
Premium features create a polished look that feels intentional. They make your house extension truly special.
Polycarbonate and Iron Balusters
Polycarbonate panels offer practical protection with clear views. This tough material installs below screening on railings.
It blocks wind-driven rain and dust while maintaining visibility. Simply hose it clean from outside when needed.
Iron balusters provide superior durability over wood options. They resist rot and weather damage beautifully.
This upgrade elevates the entire look of your space. It requires minimal maintenance over years of use.
Custom Trim and French Doors
Quality trim work gives doors and windows finished appeal. It creates cohesive transitions throughout the area.
French doors dramatically improve access and visual flow. They open outward to avoid hitting interior cabinets.
Sleek black handles complement modern aesthetics perfectly. Proper installation ensures long-term satisfaction.
Window treatments like arched designs add architectural interest. Even faux-arched panels create elegant appearances.
Screened Porch Addition Maintenance
Keeping your outdoor living area in top condition ensures you’ll enjoy it for many seasons to come. While it offers protection, this space still needs regular care to stay clean and functional.
Cleaning and Upkeep Tips
Pollen, dust, and debris will find their way inside. A quick routine makes a big difference. Many owners use a leaf blower and wipe down furniture before relaxing.
Heavy pollen seasons, like the three-week period common in Georgia, require more frequent attention. Gentle cleaning is key for screen longevity. Use mild soap and water, and check for small tears regularly.
“We use this room almost every day. A quick wipe-down keeps it ready for enjoyment.”
Seasonal tasks protect your investment. Hose down polycarbonate panels from the outside. Inspect the framing for any signs of wear or damage.
| Maintenance Task | Frequency | Key Benefit |
|---|---|---|
| Surface Wiping | Before Use | Prevents dirt buildup |
| Screen Inspection | Monthly | Catches tears early |
| Floor Cleaning | Weekly | Maintains appearance |
| Plant Trimming | Seasonally | Prevents root damage |
Keep plants and landscaping away from the structure’s foundation. This simple step prevents potential damage from roots or vines. Your efforts will pay off with years of comfortable use.
Addressing Weather and Durability
Creating a durable outdoor space means thinking about how it will handle different weather conditions. Your protected area should stand strong against sun, rain, and wind while keeping you comfortable.
Weather Protection Techniques
A well-designed outdoor room offers excellent protection compared to open decks. It shields you from direct sun and light rain while allowing fresh air circulation.
Sun exposure matters greatly for spaces facing south or southwest. Intense afternoon sun during summer months can make areas unbearably hot. Proper roof coverage and strategic design create comfortable shade.
Roof structures provide crucial rain protection. They allow you to enjoy your space even during light showers that would cut short outdoor time on open decks.
Wind protection comes from quality screening and solid railings. Polycarbonate panels reduce wind speed and block dust. This makes breezy conditions much more manageable.
| Weather Element | Protection Method | Benefit |
|---|---|---|
| Intense Sun | Proper roof overhang | Reduces heat buildup |
| Rain Showers | Quality roofing materials | Extends usable time |
| Strong Winds | Polycarbonate panels | Blocks debris |
| Seasonal Changes | Durable screening | Year-round protection |
Material choices greatly affect weather resistance. Composite decking resists rot and moisture damage. Cedar wood framing naturally withstands exposure better than standard lumber.
Quality screening materials handle UV exposure and temperature changes well. They shouldn’t sag or become brittle over time. This ensures long-term performance.
Your outdoor season extends beyond perfect summer days. A properly built space makes spring and fall months equally enjoyable. Thoughtful construction creates year-round comfort.
Energy Efficiency and Outdoor Comfort
Achieving true comfort in your outdoor room requires thoughtful attention to lighting and airflow. These elements work together to create a space you’ll enjoy throughout the seasons.
Maximizing Natural Light
Preserving daylight should guide your design decisions. Smart placement ensures your structure doesn’t block existing windows that brighten interior rooms.
This approach maintains a bright, welcoming atmosphere. You’ll appreciate the connection to outdoors while keeping adjacent spaces like kitchens well-lit.
For evening use, recessed lights with dimmer switches offer excellent flexibility. They provide everything from bright task lighting to subtle ambient glow.
Ventilation and Fans
Ceiling fans become essential during warm summer months. They create air circulation that transforms stagnant areas into pleasant retreats.
Choose outdoor-rated models designed for humidity and temperature changes. The Hunter Bayview 54-inch fan offers quiet operation with wicker-look styling.
White fans blend seamlessly with light ceilings for unobtrusive appearance. Proper ventilation through screening combined with fan movement creates natural cooling.
This reduces or eliminates the need for air conditioning. Prewiring during construction represents smart planning for future electrical needs.
Including speaker wiring during initial building follows cost-effective strategies for large-scale renovations. Adding these features later requires significantly more work and expense.
Troubleshooting Construction Challenges
Every construction project encounters unexpected hurdles, and your porch build is no exception. Being prepared for these issues helps keep your project moving forward smoothly. A calm, systematic approach makes all the difference when challenges arise.
The permit process begins with filing paperwork before any work starts. This triggers periodic inspections at various building stages. Your local county will check that everything meets code requirements.
Handling Inspections and Permits
Many homeowners must also get HOA approval for their project. Submit detailed plans and get written confirmation before breaking ground. This prevents costly conflicts or required changes later.
Inspections can reveal surprising requirements. One homeowner’s project failed inspection because hurricane clips were missing. Quality contractors quickly address these issues to maintain momentum.
Thorough research before starting pays off greatly. Reading books about porch construction helps you understand the process. This knowledge lets you make informed decisions and follow what contractors are doing.
Getting multiple estimates (3-5 recommended) provides valuable learning opportunities. Each contractor may suggest new ideas or point out important details. This estimate process educates you about different approaches to your house project.
Open communication with your building team ensures problems get solved quickly. Ask questions when uncertain and address concerns promptly. Working collaboratively creates better results than adversarial relationships.
Building a Screened Porch Addition
Transforming your backyard dreams into reality requires following a systematic approach from start to finish. This journey begins with vision and careful planning.
Step-by-Step Guide
Start by defining your needs for the new outdoor living space. Consider how your family will use this area for daily enjoyment. Establish a realistic budget that aligns with your goals.
The design phase involves researching styles and creating detailed plans. Select materials that balance beauty with durability. Finalize your layout to maximize functionality.
Before construction begins, secure all necessary approvals. Check local building codes and obtain required permits. This ensures your project meets safety standards.
Key Considerations
Choose contractors carefully by getting multiple estimates. Verify their credentials and review past work. Regular communication keeps your project on track.
Construction follows a logical sequence from foundation to finishing touches. Expect some disruption but protect your existing home from damage. Flexibility helps handle unexpected challenges.
Your completed space becomes a cherished part of family life. It adds value to your property while creating memories. This investment pays dividends for years to come.
Conclusion
Your dream of a comfortable outdoor retreat is now within closer reach. Screened-in porches transform ordinary yards into cherished living spaces your family will enjoy every day.
These structures offer tremendous value for any home. You gain protection from insects and weather while expanding your usable area. The investment pays off for years through daily enjoyment and increased property value.
Take your time with planning and research. Thoughtful decisions about design and materials ensure your project succeeds. Whether you choose professional help or DIY, customization fits your unique needs.
Thanks for exploring this comprehensive guide with us. We hope it provides valuable inspiration for creating your perfect outdoor sanctuary. Your bug-free relaxation space awaits!
FAQ
How much does a typical screened-in porch addition cost?
The price varies widely based on the room’s size, materials, and your location. A basic project might start around ,000, while a larger, more detailed space with high-end features can exceed ,000. It’s best to get a few quotes from local contractors for an accurate estimate for your home.
What is the best flooring material for a screened porch?
For a durable and weather-resistant floor, composite decking is a top choice. It resists water, rot, and insects, requiring very little upkeep. Other great options include concrete pavers or traditional wood treated for outdoor use. Your choice will depend on your budget and desired style.
Can I convert my existing deck or patio into a screened-in space?
A> Absolutely! Converting a current deck is a popular and often cost-effective way to add this living area. A contractor will need to check if the existing structure’s base and roof can support the new walls and screens. This process can sometimes be quicker than building from the ground up.
How do I keep the space comfortable during hot summer days?
A> Good airflow is key. Installing a ceiling fan is one of the simplest and most effective ways to circulate air and keep you cool. For even more comfort, some homeowners opt for an outdoor-rated mini-split air conditioning unit to control the temperature year-round.
Do I need a permit to build a screened porch addition?
A> In most areas, yes. Because you are altering the footprint of your house, you will likely need building permits. Your local building department will have specific rules about size, placement, and construction. A professional builder can usually handle this process for you.
What kind of furniture holds up best in a screened room?
A> Look for pieces made from all-weather materials like aluminum, teak, or synthetic wicker. These materials are designed to withstand humidity and temperature changes. Adding cushions made with Sunbrella® fabric will ensure they stay vibrant and resist water and fading for years.


