Welcome to a guide that tackles one of the most valuable improvements you can make to your living space. Many American houses struggle with uneven temperatures and expensive utility costs. The solution often lies in addressing what’s happening right above your ceiling.
This comprehensive resource will walk you through everything about improving your home’s thermal barrier. You’ll learn how to recognize when it’s time for a change and understand different material options. We’ll cover practical installation approaches that deliver real results.
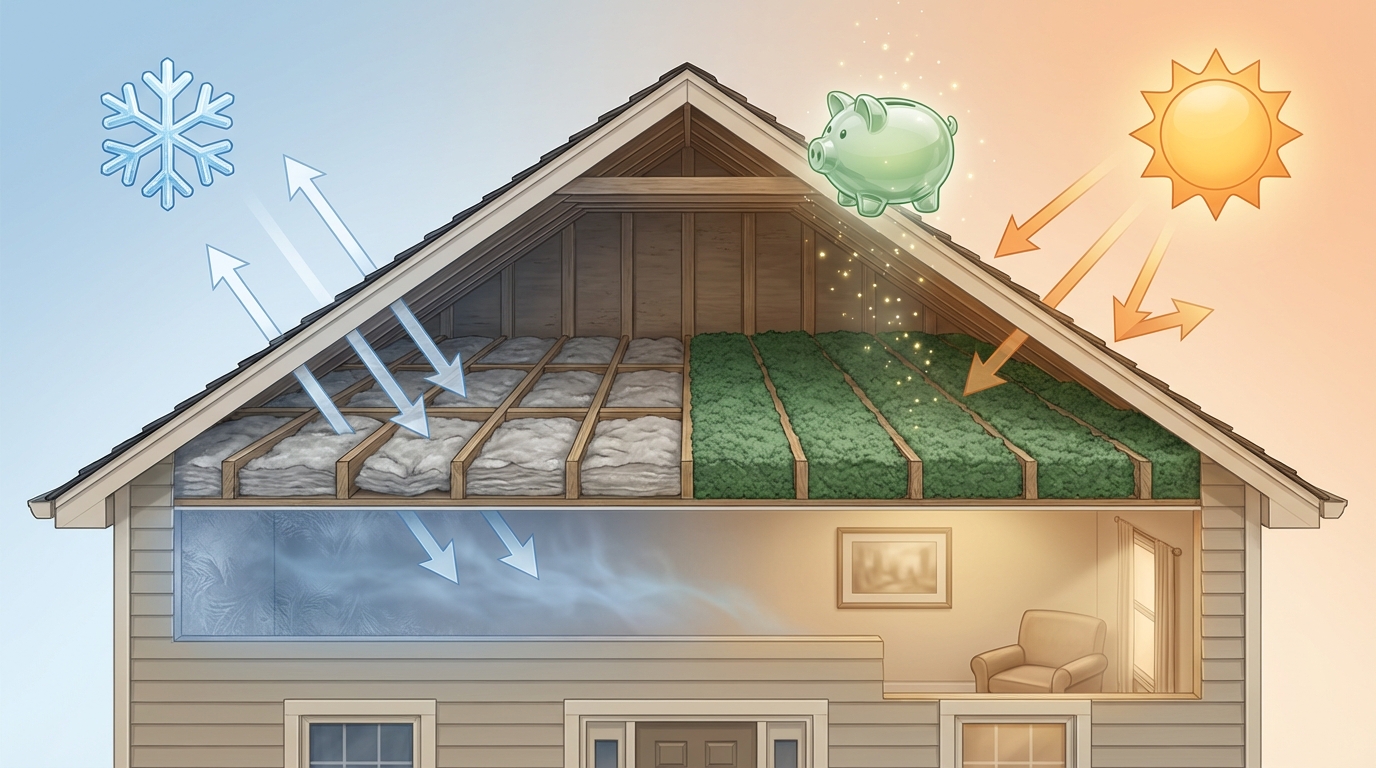
Proper thermal protection isn’t just about staying cozy in winter or cool during summer months. It’s about creating a more efficient dwelling that saves money every single month. A well-protected space also increases your property’s overall value.
We’ve designed this information to be accessible and practical. You’ll discover clear signs that your current system might be failing. We’ll compare materials, discuss costs, and explore rebate programs that make improvements more affordable.
Whether you’re dealing with drafty rooms, soaring energy bills, or an overworked HVAC system, understanding your home’s thermal dynamics is the first step toward lasting comfort and financial benefits.
Key Takeaways
- Many temperature and energy bill problems originate from inadequate overhead protection
- Improving your home’s thermal barrier delivers both immediate comfort and long-term savings
- Recognizing the signs of needed improvements is the first step toward solution
- Various material options exist to suit different homes and budgets
- Financial incentives and rebates can make this improvement more affordable
- A proper thermal system reduces strain on your HVAC equipment
- This enhancement increases both your comfort and your property’s market value
Introduction: The Importance of Attic Insulation in Home Comfort
Many homeowners overlook the critical connection between overhead spaces and indoor comfort. Your house’s thermal barrier plays a fundamental role in maintaining consistent temperatures throughout living areas.
Understanding Energy Efficiency at Home
A startling NAIMA.org study reveals that 90% of U.S. homes lack proper thermal protection. This means most families live with inadequate defense against energy waste.
Approximately 35% of residential energy use gets wasted annually. This represents significant financial loss and environmental impact. Proper thermal barriers prevent outdoor temperatures from disturbing your climate-controlled environment.
Homes contain protective materials in walls, floors, and other areas. These elements work together to maintain comfortable conditions. The overhead space requires special attention because roofs experience the most extreme temperature exchanges.
How Insulation Impacts HVAC Performance
Your climate control equipment works hand-in-hand with thermal barriers and ductwork. When any component underperforms, you’ll notice temperature inconsistencies and higher bills.
Homeowners could save up to 45% on energy costs with the right combination of thermal protection and air sealing. This creates a comfortable, cost-effective living space that doesn’t waste energy heating or cooling the outdoors.
Understanding home energy efficiency starts with recognizing that proper thermal management forms the foundation of household comfort. It’s the first step toward creating a more efficient dwelling.
Understanding Home Energy Efficiency and Its Impact on Your Bills
The relationship between your home’s thermal protection and energy costs is more direct than many realize. Your monthly utility statements often reflect how effectively your living space maintains comfortable conditions.
How Poor Insulation Drives Up Energy Costs
When thermal barriers underperform, conditioned air escapes while outdoor temperatures infiltrate your home. This forces your climate control system to work continuously.
Seasonal bill fluctuations are normal. However, dramatic increases suggest problems with your overhead thermal protection. Your HVAC equipment strains to compensate.
The table below illustrates how different levels of thermal protection affect annual energy expenses:
| Thermal Protection Level | Summer Energy Cost | Winter Energy Cost | Annual Savings Potential |
|---|---|---|---|
| Poor | $450-600 | $550-700 | Base Level |
| Average | $350-500 | $450-600 | 15-25% |
| Good | $250-400 | $350-500 | 30-40% |
| Excellent | $150-300 | $250-400 | 45-55% |
The Role of Insulation in Maintaining Consistent Temperatures
Effective thermal barriers prevent hot and cold spots throughout your home. Rooms maintain even temperatures without drastic variations.
This consistency reduces strain on your HVAC system. You’ll enjoy both immediate comfort improvements and long-term equipment preservation.
Understanding these relationships helps homeowners make informed decisions. Exploring cost-effective renovation strategies can maximize your investment in home energy efficiency.
Signs It’s Time for an Attic Insulation Upgrade
Most homeowners discover they need better thermal barriers by experiencing specific household issues. You don’t need special training to recognize when your home’s protective layer above isn’t performing correctly.
The problems are often felt before they’re seen. Your living space provides clear clues that something needs attention.
Indicators: Cold Rooms, Air Leaks, and Overactive HVAC Systems
Certain rooms refusing to stay warm is a classic symptom. This suggests your thermal barrier isn’t working properly with the climate control equipment.
You might notice inconsistent temperatures throughout different areas. Some spaces feel comfortable while others are too hot or cold. Your HVAC system runs constantly trying to compensate.
During summer, the air conditioning struggles to keep up. In winter, the heating never seems to shut off. These patterns indicate significant energy waste.
Red Flags: Moisture, Mold, and Pest Intrusions
Moisture problems create serious health concerns. When existing insulation fails, it can trap humidity rising from your living space.
Inadequate protection allows ceiling surfaces to remain cold. Warm, humid air from bathrooms condenses, creating perfect conditions for mold growth. This can trigger respiratory issues.
Pest intrusions are another warning sign. Animals find thermal materials irresistibly cozy. Their presence contaminates indoor air quality.
For a comprehensive look at specific indicators your overhead protection needs, this resource provides detailed guidance.
| Warning Sign | Common Symptoms | Recommended Action |
|---|---|---|
| Temperature Issues | Cold rooms, uneven heating, constant HVAC operation | Evaluate thermal barrier effectiveness |
| Air Leaks | Drafts, increased dust, stuffy rooms in summer | Check for gaps and seal openings |
| Moisture Problems | Condensation on ceilings, mold growth, musty odors | Assess ventilation and material condition |
| Pest Evidence | Strange noises, droppings, visible animal activity | Inspect for damage and contamination |
| Energy Bills | Spikes beyond normal seasonal changes | Review overall home efficiency |
Choosing the Best Insulation Materials for Your Home
Making an informed choice about thermal protection involves comparing how various materials address your home’s particular requirements. Each option offers distinct benefits for different situations.
Comparing Fiberglass Batts, Cellulose, and Spray Foam
Fiberglass batts are the most recognizable thermal barrier, featuring pink or yellow colors. They provide good value with R-values around 2.9-4.3 per inch. Installation is straightforward, making them popular for DIY projects.
Spray foam creates an exceptional air seal with R-values of 5-6 per inch. It comes in open-cell and closed-cell varieties. This material excels in hard-to-reach areas and offers long-lasting performance.
Cellulose consists of recycled paper treated for fire resistance. With R-values of 3.2-3.8 per inch, it’s an eco-friendly choice. Proper air sealing is crucial since cellulose can absorb moisture.
| Material Type | R-Value per Inch | Best For | Installation Complexity |
|---|---|---|---|
| Fiberglass Batts | 2.9-4.3 | Standard spaces, DIY projects | Low |
| Spray Foam | 5.0-6.0 | Irregular areas, maximum sealing | High |
| Cellulose | 3.2-3.8 | Eco-conscious homeowners | Medium |
Factors to Consider: R-Value, Air Sealing, and Durability
R-value measures thermal resistance—higher numbers mean better performance. Consider your climate when selecting materials. Proper installation ensures you get the rated R-value.
Air sealing prevents energy loss through gaps and cracks. Some materials like spray foam provide built-in sealing. Others require additional measures to be effective.
Durability affects long-term performance. Materials should maintain their R-value over time and resist moisture, pests, and settling. For detailed guidance on material selection, consult this comprehensive insulation buying guide.
Air Sealing and Ventilation: Enhancing Insulation Efficiency
The effectiveness of your home’s thermal protection depends heavily on preventing air movement. Even premium materials cannot perform correctly when air slips through gaps and cracks.
Why Proper Air Sealing is Essential
Air sealing stops conditioned air from escaping through ceiling penetrations and other openings. This prevents heat loss in winter and heat gain during summer months.
Many homeowners make the mistake of adding more material without first addressing leakage issues. This approach often leads to disappointing energy savings. A smaller improvement with comprehensive sealing typically delivers better results than simply piling on layers alone.
Techniques for Sealing Attic Leaks
Identify common problem areas like recessed lighting, plumbing penetrations, and electrical wiring holes. Chimney chases and access doors also need attention.
Use appropriate materials for different situations:
- Expanding foam for larger gaps
- Caulk for smaller cracks
- Weatherstripping for attic hatches
Complete air sealing before installing new materials. This ensures the most effective thermal barrier possible.
While it might seem minor, proper sealing is one of the most cost-effective ways to improve energy efficiency. The combination of sealing and protective materials creates a synergistic system that keeps conditioned air where it belongs.
Step-by-Step Guide to Upgrading Your Attic Insulation
Proper planning and execution are crucial when enhancing your home’s energy-saving barrier above the living space. A methodical approach ensures your investment delivers lasting comfort and efficiency improvements.
Preparing Your Attic for the Upgrade
Begin by thoroughly assessing your current thermal protection. Check the depth and condition of existing materials. Look for uneven coverage, compaction, or moisture issues.
Warning signs like mold growth or pest damage indicate complete removal is necessary. Clear the space of stored items and ensure proper lighting. Address any roof leaks or structural concerns before proceeding.
Complete all air sealing work before adding new materials. This prevents energy loss through gaps and cracks. Achieving the recommended R-value for your climate zone provides optimal performance.
DIY Considerations vs. Professional Installation
While DIY projects can seem cost-effective, thermal improvements require specialized knowledge. Mistakes may lead to inadequate energy savings or moisture problems.
Professional contractors analyze your home’s specific needs and develop customized strategies. They select appropriate materials and ensure proper installation techniques.
Investing in qualified professionals guarantees your project solves climate control issues effectively. You’ll avoid common pitfalls like compressed materials losing R-value or improper vapor barrier placement.
Cost, Rebates, and Long-Term Savings on Your Insulation Upgrade
Investing in your home’s energy efficiency requires understanding both upfront costs and long-term financial benefits. A comprehensive approach addressing your entire house typically ranges from $15,000 to $20,000 when handled by certified professionals.
Every property has unique requirements that influence final pricing. Factors include material selection, space dimensions, existing conditions, and local labor rates.
Understanding Installation Costs and Financing Options
Material expenses represent just one component of your total investment. Fiberglass batts average $0.64-$1.19 per square foot, while cellulose runs $0.83-$0.91 per square foot.
Spray foam options vary significantly. Open-cell costs 35-55 cents per board foot, with closed-cell ranging from $1.00-$2.00. These prices exclude essential services like professional installation and air sealing.
Financing programs like TVA EnergyRight offer $0 down options with fixed interest rates. This makes comprehensive improvements accessible without large immediate payments.
Leveraging Rebates and Energy Tax Credits
Financial incentives significantly reduce your net investment. The same TVA program provides a $500 rebate specifically for attic improvements, with additional tax credits available nationwide.
According to Remodeling magazine’s 2016 report, homeowners recoup an average of 116% of their investment costs. This return substantially outperforms kitchen renovations at 52.5-56.1%.
View this project as a long-term investment rather than an expense. Beyond immediate comfort, you’ll enjoy lower utility bills, reduced HVAC maintenance, and increased property value.
Conclusion
American families seeking lasting comfort and financial relief have discovered a powerful solution. Improving your overhead thermal barrier delivers immediate results and long-term savings.
Recognizing warning signs like temperature inconsistencies and high bills empowers you to act. Understanding material options helps you make informed choices for your specific needs.
Professional installation ensures your project solves real problems rather than creating new ones. Available rebates and financing make this improvement more accessible than many realize.
View this enhancement as a strategic investment in your family’s well-being. You’ll enjoy better climate control, improved air quality, and increased property value.
Take the next step toward a more comfortable, efficient home. Better living conditions and lower utility costs are within your reach.


