Welcome to your complete guide for building the perfect music room. This is your path to a space where quality meets practicality. Whether you are a professional musician or a passionate hobbyist, this guide is for you.
Creating an ideal environment involves two main parts. First, you need good soundproofing to keep sound from leaking in or out. Second, you must optimize the internal acoustics for the best possible audio quality.
You will learn the science behind these concepts and find practical, budget-friendly tips. We cover how to transform any area, like a basement or spare bedroom, into a fantastic music space.
Even the best gear can sound poor in a badly designed room. Conversely, modest equipment can perform wonderfully in a properly treated environment. We will explore solutions for every skill level and budget.
By the end, you will understand how materials, techniques, and layout work together. This knowledge helps you build a space that boosts creativity and protects your hearing during practice or recording.
Key Takeaways
- Effective design combines soundproofing (containing sound) and acoustic treatment (improving internal sound quality).
- Proper room treatment can make average equipment sound significantly better.
- Solutions are available for all budgets, from professional-grade to simple DIY projects.
- The principles apply to any space, whether it’s a dedicated studio or a converted bedroom.
- Understanding basic acoustics helps you make smart choices about materials and layout.
- A well-designed music space enhances your creative experience and protects your hearing.
Fundamentals of Music Room Acoustics
Before picking materials, it’s vital to grasp the basic physics of audio energy. Sound waves are pulses of mechanical energy that travel through the air. They eventually lose this energy as they vibrate.
When these waves hit a surface, three things can happen. They can bounce back (reflection), be soaked up (absorption), or pass through (transmission). Managing these behaviors is the key to good acoustics.
Understanding the Science Behind Sound
Different materials interact with sound in unique ways. Dense structures, like certain wall panels, absorb higher frequencies. Materials such as fiberglass are excellent broad-spectrum absorbers.
Hard surfaces like concrete reflect most sound. This leads to a long reverberation time, making audio muddy. This principle is key in any multifunctional living spaces where clarity is needed.
Key Terms and Concepts Explained
You will often hear specific terms. Reverberation is the persistence of audio after the source stops. Absorption reduces sonic energy. Diffusion scatters waves, and isolation prevents sound from leaking out.
A well-treated space does more than improve audio quality. It can reduce stress and improve concentration. This keeps your mind engaged during long sessions, making the environment more productive and enjoyable.
Planning Your Music Room Design
A successful audio project starts with a thoughtful plan tailored to your specific environment. Before purchasing any materials, take time to honestly evaluate your current situation and define your audio goals clearly.
Consider what you want to achieve. Are you aiming for professional vocal recording, or simply need a practice space that won’t disturb neighbors? Each purpose requires different design approaches.
Assessing Your Space and Needs
Look closely at your room‘s architecture. Dimensions, ceiling height, and construction materials all affect how audio behaves. Proximity to noise sources like traffic or HVAC systems matters too.
Empty rooms create more echo than furnished ones. Existing furniture, carpets, and soft materials already provide some acoustic benefit. Factor these in before planning additional treatments.
Evaluate your noise challenges carefully. Is outside sound entering your space, or are you concerned about your audio escaping? This determines whether you need soundproofing or acoustic treatment.
Be realistic about your budget. Professional studio-grade solutions can be expensive, but effective DIY options exist. Many mid-range products deliver excellent results for home setups.
Think about multiple uses. Will this area serve exclusively for music, or must it function as a home office or guest room? Flexible design solutions can accommodate dual purposes.
Document everything with measurements, photos, and notes about problem areas. Identify spots where sound seems harsh, muddy, or where noise intrusion occurs most. This documentation becomes your roadmap for improvement.
Architectural Acoustic Techniques
The architectural design of your space plays a crucial role in shaping how sound behaves within it. These built-in solutions often outperform add-on treatments.
Smart architectural techniques create permanent improvements. They work with your space’s natural structure.
Leveraging Structural Elements for Better Acoustics
Existing features can enhance your audio environment. Exposed beams and angled walls break up sound reflections naturally.
Bookshelves filled with items create excellent diffusion. Varied ceiling heights prevent standing waves from forming.
These structural elements serve dual purposes. They improve aesthetics while managing sound effectively.
Integrating Absorption and Diffusion Strategies
Balancing absorption and diffusion creates ideal acoustic conditions. Too much absorption deadens a space, while too little creates echo.
Absorption converts sound energy into heat through porous materials. Diffusion scatters waves using irregular surfaces.
Strategic placement is key for both techniques. First reflection points need absorption, while rear walls benefit from diffusion.
| Technique | Primary Function | Best Applications | Common Materials |
|---|---|---|---|
| Absorption | Reduces reverberation | First reflection points, ceilings | Fiberglass, foam, fabric panels |
| Diffusion | Scatters sound waves | Rear walls, large flat surfaces | Wood diffusers, bookshelves |
| Structural | Breaks up reflections | Angled walls, varied ceilings | Beams, architectural features |
Wood surfaces with grooves serve double duty. They reduce unwanted reverberation while adding warm resonance.
Your walls offer the largest treatment canvas. Understanding when to absorb, diffuse, or reflect sound dramatically impacts final quality.
Managing Reverberation for Clear Sound
Have you ever noticed how audio clarity varies dramatically between different environments? This difference often comes from how sound waves interact with surfaces in your space. When audio bounces around too much, it creates that frustrating muddy effect where individual instruments blend together.
Excessive reverberation is the most common challenge in listening environments. Hard surfaces like drywall walls and flat ceilings cause sound to arrive at your ears at multiple times. This blurs the original audio and reduces definition.
Identifying Problem Areas in Your Room
A simple test can reveal trouble spots. Clap your hands sharply and listen for ringing or flutter echoes. This indicates reflections that need treatment. Parallel surfaces are particularly problematic, creating uneven frequency response.
Different areas contribute differently to reverberation issues. Corners tend to accumulate low-frequency energy. Large flat surfaces create mid and high-frequency reflections. Walk around your space while playing audio, noting where sound seems harsh or boomy.
In many cases, even expensive equipment sounds poor in environments with bad reverberation control. The goal isn’t to eliminate all reverberation but to control it so the reverberation time suits your needs. For larger projects, consider cost-effective strategies for large-scale renovations to address these acoustic challenges systematically.
Enhancing Sound Absorption and Control
The next step in creating your ideal audio environment involves practical absorption strategies. Controlling sound reflections is essential for clarity, whether you’re practicing or recording.
Effective sound absorption removes unwanted echo. This treatment makes every note sound crisp and distinct.
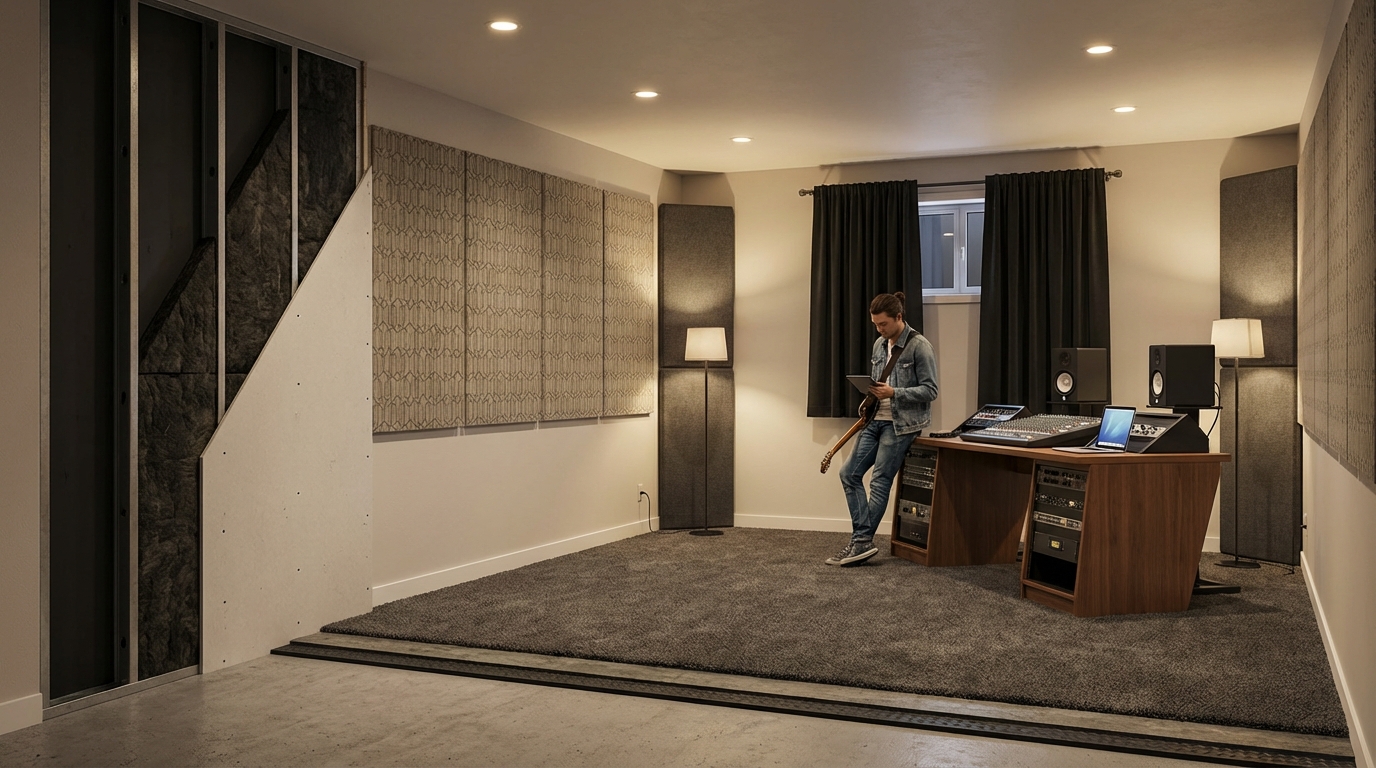
DIY Acoustic Panels and Home Solutions
You can start improving your space with items you already own. Soft fabric furniture and thick rugs provide excellent natural absorption.
Heavy curtains are a simple way to dampen reflections on windows and walls. For a custom solution, building your own panels is surprisingly effective.
Use wooden frames, rigid insulation, and breathable fabric. This DIY approach offers professional results at a fraction of the cost.
Professional Sound Absorber Options
For ready-made performance, commercial panels like AlphaSorb are a great choice. These products come in standard sizes, such as 2×2 or 2×4 feet.
They use specialized materials to convert sound energy into heat. Thicker panels (4 inches) manage low frequencies best.
Bass traps are crucial for corner placement. Remember, covering less than 30% of any wall surface prevents an overly “dead” sound. This balance is key for a lively yet clear environment in any home or studio.
Effective Soundproofing Strategies
Effective sound containment transforms any area into a private sanctuary for audio work. Unlike acoustic treatment that improves internal sound quality, soundproofing prevents noise from traveling through structural elements.
This isolation creates a barrier that protects both your creative space and your household. Proper implementation requires addressing walls, ceilings, floors, doors, and windows systematically.
Treatments for Walls, Ceilings, and Floors
The most effective wall soundproofing combines mass, air gaps, and damping compounds. Professional solutions like AudioSeal MLV barriers with Green Glue compound create impressive sound isolation.
Resilient Sound Isolation Clips (RSIC-1) decouple drywall from studs, preventing vibration transfer. This multi-layer approach significantly reduces noise transmission between spaces.
Floor treatments are crucial for upper-level rooms. Iso-Step underlayment beneath finished flooring blocks impact noise from instruments and foot traffic. Vibration pads under amplifiers prevent structural transmission.
| Area | Primary Solution | Key Benefit |
|---|---|---|
| Walls | MLV Barrier + Green Glue | Mass addition with damping |
| Ceilings | PrivacyShield Barriers | Drop ceiling improvement |
| Floors | Iso-Step Underlayment | Impact noise reduction |
Ceiling treatments follow similar principles. For drop ceilings, PrivacyShield tile barriers and light hoods enhance isolation without major renovation.
Doors and windows often represent the weakest links. Hollow-core doors should be replaced with solid-core versions. Complete seal kits prevent sound leakage around frames.
Window solutions range from simple seal kits to heavy blankets. For comprehensive soundproofing, consider secondary panes with air gaps. Every potential sound path must be addressed to achieve true soundproof room performance.
Optimizing Speaker Placement and Equipment
Getting the most out of your audio setup is less about expensive gear and more about smart placement. Your speaker arrangement is one of the easiest and most cost-effective ways to dramatically improve clarity within your listening space.
Consider a common issue: a center channel speaker pushed way back on a glass shelf. The sound from the tweeter bounced off the surface, creating a muddy effect. Simply scooting the speaker forward a bit so it fired past the edge fixed the problem in a simple way.
Adjusting Speaker Positions for Better Clarity
Start by positioning your main stereo speakers or studio monitors to form an equilateral triangle with your listening position. If the speakers are six feet apart, you should sit six feet away from each one. This creates the ideal “sweet spot” for sound.
Height is critical. Tweeters should be at ear level. This often requires stands or isolation pads. Avoid placing speakers directly against walls or in corners, as boundaries cause bass to build up excessively.
Subwoofer placement is tricky. For smoother bass, try the “subwoofer crawl.” Place the sub in your seat, then crawl around the room’s perimeter to find where bass sounds best. That’s its ideal spot.
For multi-instrument setups, thoughtful positioning minimizes bleeding between instruments. Use isolation platforms to decouple amps from the floor. As noted in this audiophile’s guide to optimizing the listening, small adjustments make a huge difference.
Trust your ears. Move speakers in small increments and listen to familiar music. Note how changes affect clarity and sound staging. Even the most expensive system will underperform if positioned incorrectly, but proper placement can unlock your system‘s true potential, ideal for a home studio.
| Component | Key Placement Rule | Common Mistake | Quick Fix |
|---|---|---|---|
| Main Speakers | Form an equilateral triangle with listener | Too close to walls | Pull into the room 1-2 feet |
| Subwoofer | Location dependent on room modes | Stuck in a corner | Use the “subwoofer crawl” method |
| Studio Monitors | Tweeters at ear level | Sitting directly on a desk | Use isolation pads or stands |
Expert Tips and Real-Life Experiences
Real-world success stories demonstrate how acoustic treatment transforms creative workflows. Professionals across industries share how dedicated spaces revolutionize their work.
Industry Insights and Proven Techniques
Experienced musicians report dramatic improvements after proper treatment. One guitarist described the change as “night and day” after installing panels in their practice space.
They could turn amplifiers down while maintaining clarity. Drums became less overpowering, and vocals cut through perfectly. This systematic approach delivers professional results for home setups.
Hearing protection remains crucial even in treated environments. Loud instruments like drums still require careful volume management during long sessions.
WhisperRoom Testimonials and Success Stories
Voice actors achieve broadcast-quality recording in isolation booths. One professional noted this upgrade led directly to audiobook deals and Marvel studio work.
Drummers facing noise challenges find complete solutions.
“Playing drums inside my house was not working for my family,”
shared one musician. Their WhisperRoom installation became agame-changing solution.
These spaces enable 24/7 practice with noise levels below 30dB. Creative output increases dramatically when musicians can focus without restrictions.
Audiologists even use these principles for hearing test booths. Patients consistently praise the comfortable, professional environment.
Balancing Aesthetics and Acoustic Performance
Creating an environment that sounds great doesn’t require you to compromise on visual appeal. Modern solutions blend seamlessly with your interior design while improving audio quality.
You can achieve professional results without sacrificing style. The right approach makes your space both functional and beautiful.
Choosing Materials that Complement Your Style
Fabric-wrapped panels offer incredible flexibility for your design. They come in unlimited colors and patterns to match any decor scheme.
Think beyond traditional rectangular panels. Creative shapes and arrangements can become striking wall art.
Many everyday items serve dual purposes. Heavy curtains, plush rugs, and upholstered furniture all improve sound while enhancing comfort.
Bookshelves filled with varied items provide excellent diffusion. Decorative wood paneling breaks up reflections beautifully.
For shared spaces, consider portable solutions like decorative screens. These can be positioned when needed and stored when entertaining.
The most effective acoustic materials are often desirable in interior design. Thoughtful selection creates harmony between form and function.
Conclusion
Transforming your creative space into an exceptional audio environment represents one of the most valuable investments for any serious musician. Throughout this guide, we’ve explored how proper acoustic design combines two essential approaches: soundproofing for effective isolation and internal treatment for optimal sound control.
The key insight is that even modest improvements create significant benefits. You don’t need professional studio budgets to achieve remarkable results. Strategic placement of acoustic panels, attention to detail around doors and windows, and thoughtful equipment arrangement can dramatically enhance your practice and recording experience.
Remember that every space has unique challenges. Whether you’re working with delicate acoustic instruments or powerful drum kits, targeted solutions exist. The combination of proper soundproofing and acoustic treatment creates an environment where creativity flourishes while protecting your hearing and household relationships.
Start your journey today with simple additions like area rugs or progress to comprehensive solutions. Each step brings you closer to that inspiring, professional-quality space that elevates your craft and safeguards your most valuable asset—your hearing.


