The home remodel order of operations follows a specific sequence that protects your investment, prevents mistakes, and keeps your renovation on schedule. Research from the National Association of Home Builders shows that projects completed in the wrong order are more likely to experience delays or unexpected costs. This guide explains the sequence used by professional contractors and helps you avoid common mistakes that can derail DIY projects.
Why the Renovation Sequence Matters
Skipping steps or rearranging phases often leads to problems. According to a Remodeling Magazine analysis, many homeowners who changed the standard order needed to redo completed work, adding extra time and money to their projects. The sequence exists because each phase depends on the previous one for structural integrity, electrical rough-in, and moisture protection.
For example, installing flooring before framing new walls means you’ll need to tear up the floors to run electrical wiring later. Painting before installing insulation can trap moisture in walls, leading to mold growth. The right order isn’t arbitrary—it’s designed to prioritize durability, efficiency, and cost control.
- Structural changes and envelope work come first
- Mechanical systems (plumbing, electrical, HVAC) follow
- Insulation and drywall prepare the space for finishes
- Flooring, cabinetry, and built-ins go in before paint and trim
- Fixtures and appliances are the final layer
What to Remodel First: The Core Sequence Explained
Every successful renovation starts with planning, then follows a logical flow from the bones of your home outward. Below is the industry-standard order, with reasons why each step belongs where it does.
Phase 1: Planning and Pre-Construction (Weeks 1–4)
Before any work begins, you need a complete plan of what you’re building and how you’ll build it. This phase includes budgeting, permits, design finalization, and contractor selection. According to the U.S. Department of Housing and Urban Development, projects that skip this step are more likely to exceed budget.
Key actions:
- Finalize architectural plans and engineering drawings (if structural changes)
- Secure necessary permits—electrical, plumbing, structural, and building codes
- Choose and contract with your remodeler or assemble your DIY team
- Order long-lead items (windows, custom cabinets, specialty flooring)
- Set up a temporary living space if you’re staying in the home
Tip: Use project planning tools to create a visual timeline and checklist to track dependencies and avoid scheduling conflicts.
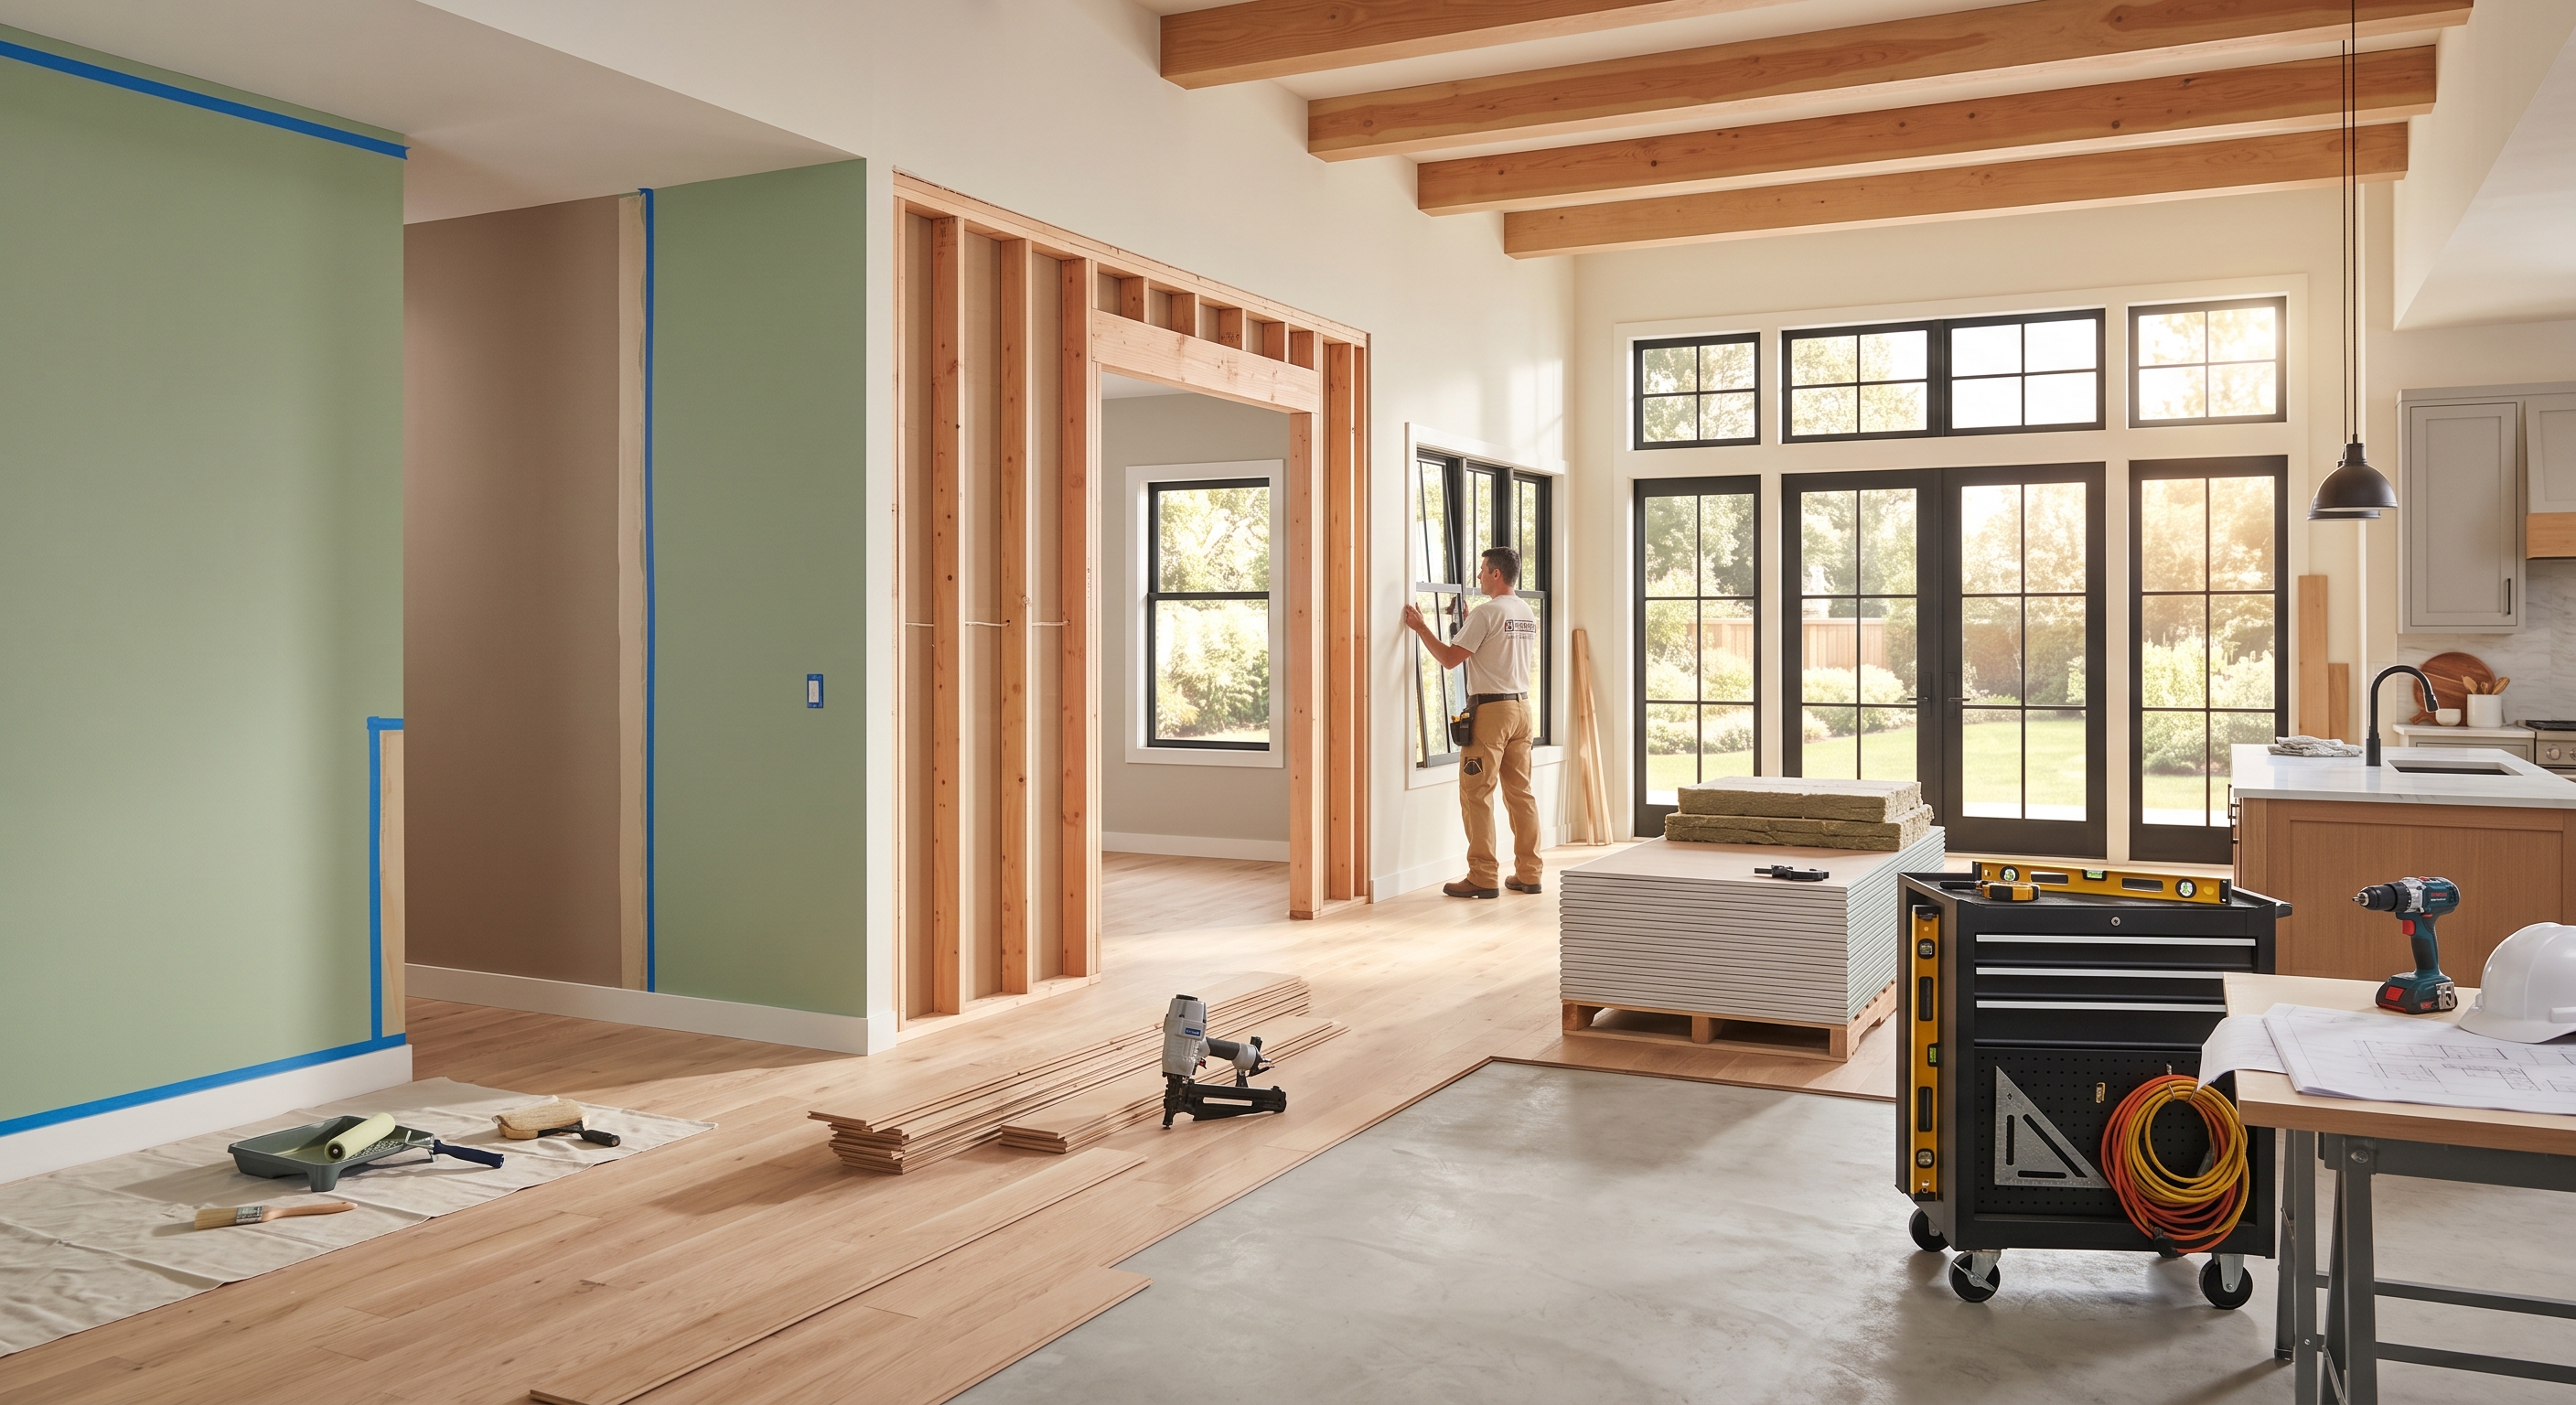
Phase 2: Structural Work and Demolition (Weeks 5–8)
This is where the transformation begins. Structural changes—removing walls, opening ceilings, reinforcing beams, or building new additions—must come first because they define the entire space. Demolition must be thorough: old wiring, plumbing, ductwork, and insulation should all be removed unless they’re being reused exactly as is.
A study by Construction Dive found that many renovation delays stem from unplanned structural discoveries discovered after finishes are installed. Fixing these after drywall can cost significantly more than addressing them upfront.
What to expect:
- Load-bearing wall removal requires engineered beams and temporary supports
- Floor systems may need reinforcement for new layouts or loads
- Windows and doors are often reframed to match new openings
- Asbestos, lead, or mold remediation must be completed before proceeding
Why You Can’t Skip Structural Prep
If you’re adding a master suite or expanding a kitchen, the floor and ceiling framing come before any finishes. Even a cosmetic remodel—like opening a pass-through between kitchen and dining room—requires structural review. According to the International Code Council, any opening that compromises a load-bearing wall must be engineered by a licensed professional.
Phase 3: Mechanical Rough-In (Weeks 9–12)
Once the structure is sound, it’s time to run the invisible systems that make a home functional: plumbing, electrical, and HVAC. These systems must be installed before walls are closed up, because once drywall goes up, accessing them means tearing everything apart.
Plumbing rough-in includes new pipes for sinks, showers, toilets, and appliances. It also includes drain waste vent (DWV) systems—critical for preventing sewer gas buildup. The American Water Works Association reports that improper venting can cause indoor air quality issues in remodeled homes.
Electrical rough-in involves running wires to outlets, switches, light fixtures, and dedicated circuits (for kitchen, laundry, home office). Modern homes typically need 200-amp service with AFCI and GFCI protection. Electrical Contractor magazine notes that many electrical fires originate from outdated or improperly installed wiring.
HVAC rough-in includes new ductwork, vents, and zoning systems for better temperature control. According to U.S. Department of Energy, properly sized ductwork can improve HVAC efficiency.
Why the Order Matters Here
Plumbing and electrical must be inspected and approved before insulation and drywall. If you install drywall first, you’ll need to cut large sections to fix pipes or wires—a major setback. In fact, the Remodeling 2025 Cost vs. Value Report found that redoing electrical after drywall increases project costs.
Phase 4: Insulation, Drywall, and Moisture Control (Weeks 13–16)
With mechanical systems in place, the next step is to create an airtight, insulated envelope. Proper insulation reduces energy bills and prevents condensation that leads to mold and rot.
- Insulation: Install fiberglass batts, spray foam, or rigid foam boards in walls, ceilings, and floors. Spray foam offers the best air sealing but costs more.
- Drywall: Hang gypsum board on walls and ceilings. Use moisture-resistant drywall (green board) in bathrooms and basements.
- Air sealing: Caulk and foam all gaps around windows, doors, electrical boxes, and plumbing penetrations. This step reduces drafts and prevents moisture issues.
The U.S. Environmental Protection Agency warns that poor air sealing can increase heating and cooling costs in a typical home. It also allows humid air to condense in walls, creating conditions for mold growth.
Phase 5: Flooring Installation (Weeks 17–20)
Flooring goes down after drywall to avoid damage from paint, tools, and foot traffic. The exception: tile or stone in wet areas (bathrooms, kitchens) may be installed before drywall to allow for proper waterproofing behind the tub or shower.
Material choices impact timing:
- Hardwood: Can take weeks to acclimate and install. Prefinished hardwood is faster than site-finished.
- Luxury vinyl plank (LVP): Installs in days and resists moisture.
- Tile: Requires a flat, stable substrate. Uneven subfloors must be leveled first.
- Carpet: Best installed after painting to avoid paint spills.
Tip: Choose flooring that matches your lifestyle. The Flooring Upgrades guide helps you pick the right material for each room based on durability, comfort, and maintenance.
Phase 6: Interior Finishes: Cabinetry, Trim, and Built-Ins (Weeks 21–28)
This is where your home starts to look like a finished space. Cabinetry, shelving, and built-in furniture are installed next because they’re heavy and need solid backing. Trim (baseboards, crown molding, door casings) follows, then doors and hardware.
Key considerations:
- Custom cabinets: May take months to manufacture. Order early.
- Trim: Primed trim should be installed before painting for a seamless finish.
- Hardware: Handles, knobs, and pulls are installed last to prevent damage during installation.
The HUD User reports that kitchens with custom cabinetry see strong ROI at resale. But if cabinets are installed after flooring, you risk scratching or gouging the floor during installation.
Phase 7: Painting and Wall Finishes (Weeks 29–30)
Painting comes after all dust-generating work (drywall sanding, flooring installation) to avoid repainting. Use high-quality paint with a satin or semi-gloss finish in high-traffic areas like kitchens and hallways. According to Paint Quality Institute, premium paints resist fading and staining longer than budget options.
Wall finishes like wainscoting, beadboard, or shiplap should be installed before painting. These elements often require filling, sanding, and priming before the final coat goes on.
Phase 8: Fixtures, Appliances, and Final Touches (Weeks 31–32)
The final layer includes all functional and aesthetic elements: faucets, light fixtures, switches, outlets, appliances, and decorative hardware. These are installed last because they’re easily damaged and are often final inspection items.
Key items in this phase:
- Lighting: Install ambient, task, and accent lighting. A layered lighting plan improves both function and ambiance. See our guide on choosing the perfect light fixtures.
- Smart home devices: Install before painting and flooring to avoid damage. Consider smart home trends that improve convenience and energy efficiency.
- Appliances: Range, refrigerator, dishwasher, and washer/dryer are typically installed after flooring to prevent damage and ensure proper fit.
Tip: Schedule a final walkthrough with your contractor to ensure everything is installed per code and plan. Use a punch list to track any touch-ups needed before move-in.
Renovation Phases and Steps: A Room-by-Room Example
Here’s how the sequence plays out in real projects, using kitchen and bathroom remodels as examples.
Kitchen Remodel: A Step-by-Step Timeline
According to the Kitchen Remodeling Where To Start And What To Expect, the average kitchen remodel takes 10–12 weeks when sequenced correctly.
| Week | Phase | Key Tasks |
|---|---|---|
| 1–4 | Planning and Permits | Design finalization, permit applications, contractor selection, material ordering |
| 5–6 | Demolition | Remove old cabinets, countertops, flooring, and appliances. Check for electrical/plumbing reroute needs. |
| 7–9 | Structural and Mechanical Rough-In | Open ceiling for ductwork, reroute plumbing lines, install new electrical circuits, run new HVAC ducts |
| 10–11 | Insulation and Drywall | Insulate walls and ceiling, hang drywall, tape, sand, and prime |
| 12 | Flooring | Install luxury vinyl plank or tile flooring (except under sink areas) |
| 13–16 | Cabinetry and Trim | Install upper and lower cabinets, countertops, backsplash, and trim |
| 17 | Painting | Prime and paint walls, ceiling, and trim |
| 18 | Fixtures and Appliances | Install faucet, sink, range, refrigerator, dishwasher, light fixtures, and smart devices |
This sequence ensures that no finished surface is damaged by later work. For example, painting after cabinetry prevents paint overspray on wood finishes. Installing flooring before cabinets avoids scratches and allows for precise cabinet placement.
Bathroom Remodel: A Real-World Walkthrough
Bathroom remodels follow the same core sequence but with added emphasis on waterproofing and ventilation. The Ultimate Guide To Bathroom Renovations outlines the bathroom-specific order:
- Demolition and Rough-In: Remove old tub/shower, vanity, flooring, and toilet. Install new plumbing for shower, sink, and toilet. Run electrical for GFCI outlets and lighting.
- Waterproofing: Install shower pan liner or Schluter Kerdi system before tile. This prevents water damage to subfloor and studs.
- Tile: Install floor tile first, then wall tile up to at least 72″ high to protect from water splash.
- Drywall: Use moisture-resistant drywall behind tile areas.
- Counters and Cabinetry: Install vanity, countertop, and mirror.
- Trim and Paint: Install baseboards and paint ceiling and walls.
- Fixtures: Install faucet, showerhead, toilet, light fixtures, and exhaust fan.
The EPA reports that many bathroom moisture problems originate from improper waterproofing behind tile. Installing drywall before waterproofing is a common—and costly—mistake.
Construction Sequence Planning: Tools and Tips to Stay on Track
Managing a remodel timeline requires coordination. Use these strategies to keep your project on schedule and within budget.
Build a Dependencies Map Before You Begin
List every task and its predecessors. For example:
- Drywall cannot start until electrical and plumbing rough-in are inspected
- Tile cannot be installed until the shower pan is waterproofed and inspected
- Appliances cannot be delivered until flooring is installed and acclimated
Use a Gantt chart or digital project management tool (like Trello or Asana) to visualize these dependencies. The Project Planning Tools For Home Renovations article includes templates you can adapt for your project.
Order Materials Early and in the Right Sequence
Long-lead items—custom cabinets, specialty tile, windows, and appliances—often take months to arrive. Order them as soon as your plans are finalized. The Understanding Costs Of DIY vs Professional Renovations guide explains how to prioritize material orders based on your budget and timeline.
Tip: Order tile and flooring together to ensure color consistency across rooms. Most manufacturers offer coordinated collections that install seamlessly.
Inspect After Each Phase
Don’t assume everything is fine—inspect after each major phase:
- After rough-in: Check that all electrical outlets are grounded and plumbing lines are pressure-tested
- After insulation: Verify R-value and air sealing
- After drywall: Look for cracks, uneven seams, or moisture damage
- After flooring: Check for gaps, unevenness, or manufacturer defects
Use a checklist and take photos at each step. These records protect you during final inspections and warranty claims.
Prepare for the Unexpected
Even with perfect planning, surprises happen. Common issues include:
- Discovering asbestos in walls (common in homes built before 1980)
- Finding mold behind bathroom tile
- Uneven subfloors requiring leveling
- Electrical panel not meeting current load needs
- Permits expiring before project completion
Build a 10–15% contingency into your budget and timeline for these inevitabilities. The What Really Affects Your Renovation Timeline article breaks down the top delay triggers and how to mitigate them.
What to Remodel First: Room Priorities Based on Use and ROI
Not all rooms are equal when it comes to remodeling order. Focus on high-impact, high-use spaces first to maximize your investment and daily living benefits.
High-Priority Rooms: Where to Start Your Remodel
These rooms deliver the most value in terms of ROI and livability:
| Room | Why It Belongs First | ROI (2026) |
|---|---|---|
| Kitchen | The heart of the home—used daily. Improves functionality and home value. | 63–70% (Nationwide average) |
| Primary Bathroom | Daily use. Small changes (new vanity, lighting, tile) create big impact. | 60–68% |
| Master Suite Addition | Increases home value and comfort. Structural change requires early planning. | 55–65% (varies by market) |
| Main Living Areas (Living Room/Dining Room) | High visibility. Cosmetic updates (paint, flooring, lighting) transform the space. | 50–60% |
| Second Bathroom | Adds convenience and value. Less complex than primary bath. | 55–63% |
According to the Remodeling 2026 Cost vs. Value Report, kitchens and bathrooms consistently top the ROI charts, while attic or basement remodels rank lower unless they’re converted to livable space.
Lower-Priority Rooms: Save for Later or Do Cosmetically
Rooms like guest bedrooms, home offices (unless frequently used), or basements (unless finished) can wait. Focus your budget and energy on the spaces that impact daily life the most. If you’re remodeling for resale, prioritize curb appeal and kitchen/bath updates first.
For example, a basement finish project can wait until after you’ve updated the kitchen and bathrooms. But if you’re adding a second bathroom for aging in place, it may take priority over cosmetic living room updates. See our guide on Aging In Place Renovation Trends for long-term planning tips.
Remodel Project Management: Who Does What and When
Whether you’re hiring a contractor or going DIY, you need a clear division of labor. This section helps you understand roles, timelines, and decision points.
Hiring a General Contractor vs. Doing It Yourself
Only a minority of homeowners successfully complete major renovations without professional help. Contractors bring expertise in sequencing, permits, and trade coordination—but they’re not free. Weigh the costs carefully.
If you’re DIYing, break your project into phases you can manage. For example, you might do demolition and painting yourself but hire a plumber for rough-in. Always verify that you’re allowed to perform the work in your area—some regions require licensed pros for electrical and plumbing.
The How To Vet And Select The Right Contractor guide walks you through checking licenses, insurance, and past project portfolios.
Trade Coordination: The Overlooked Time Killer
Even with a contractor, trades often overlap or wait for each other. A typical timeline involves:
- Electrician (3–5 days)
- Plumber (5–7 days)
- HVAC technician (2–3 days)
- Drywall crew (5–7 days)
- Flooring installer (2–4 days)
- Painter (3–5 days)
If one trade is delayed, the next ones are too. Build in buffer time between phases to avoid snowballing delays. The Renovation Timeline Planning What To Expect Month By Month article includes a sample month-by-month schedule you can adapt.
Decision Fatigue: When to Lock In Choices
Every remodeling project involves many small decisions—from faucet finishes to tile patterns. Lock in big-ticket decisions (cabinets, countertops, appliances) as early as possible to avoid delays. The Planning Renovations For Maximum ROI guide helps you prioritize decisions based on impact and cost.
Tip: Create a “decision deadline” calendar. For example, choose flooring by week 8, paint colors by week 10, and light fixtures by week 14. This keeps your project moving forward.
Common Mistakes in Remodel Project Management—and How to Avoid Them
Even experienced renovators slip up. Here are frequent mistakes that derail timelines and budgets, and how to prevent them.
Mistake 1: Skipping the Permit Process
Permits aren’t optional—they’re legal requirements that ensure your work meets safety codes. According to the ICC, unpermitted work can void your homeowner’s insurance and reduce resale value. In some regions, you may even be forced to undo completed work.
How to avoid: Check with your local building department early. Even cosmetic changes like removing a non-load-bearing wall often require permits.
Mistake 2: Prioritizing Aesthetics Over Function
Choosing beautiful materials without considering durability or maintenance is a recipe for regret. For example, white oak flooring looks stunning but scratches easily in high-traffic areas. Similarly, marble countertops stain and etch with acidic foods.
How to avoid: Balance beauty with practicality. Use Flooring Upgrades to pick materials that suit your lifestyle.
Mistake 3: Ignoring Moisture and Ventilation
Bathrooms, kitchens, and basements are moisture hotspots. Skipping vapor barriers, improperly vented fans, or inadequate waterproofing leads to mold, rot, and structural damage. The EPA estimates that mold remediation costs vary widely depending on severity.
How to avoid: Install bathroom and kitchen exhaust fans rated for the room size. Use moisture-resistant drywall in wet areas. Waterproof shower pans with a membrane system.
Mistake 4: Underestimating Lead Times for Materials
Custom cabinets, specialty tile, and high-end appliances often take months to arrive. Ordering too late causes delays and may force you to use in-stock alternatives that don’t match your vision.
How to avoid: Order long-lead items as soon as plans are finalized. The Project Planning Tools For Home Renovations article includes a checklist for tracking material orders.
Mistake 5: Forgetting About the Homeowners Association (HOA)
If you live in an HOA community, you may face architectural review boards, material restrictions, or even fines for unapproved changes. The Community Associations Institute reports that many HOA disputes involve unapproved renovations.
How to avoid: Review your HOA covenants before planning. Submit materials and plans for approval early. Keep a copy of all approvals on site.
What Really Affects Your Renovation Timeline: The Hidden Factors
It’s not just about the work—external factors can slow your project. Here are common issues and how to mitigate them.
Supply Chain Delays
Global supply chain issues continue to affect lead times for cabinets, tile, and appliances. In 2025, the average delay for custom cabinetry was months.
Mitigation: Order early. Choose in-stock or modular options if timing is tight. Consider prefabricated elements for faster installation.
Weather and Seasonality
Outdoor projects—like roofing, siding, or foundation work—are weather-dependent. Extreme heat, cold, or rain can halt progress for days or weeks.
Mitigation: Schedule outdoor work for temperate seasons. Build in buffer time for weather delays.
Material Shortages
Popular materials like quartz countertops, luxury vinyl plank, and certain hardwood species sell out quickly. Shortages can add weeks to your timeline.
Mitigation: Diversify suppliers. Order materials from multiple vendors to hedge against shortages.
Labor Shortages
Skilled tradespeople—electricians, plumbers, carpenters—are in high demand. The U.S. Bureau of Labor Statistics projects strong growth in construction jobs, straining the labor market.
Mitigation: Book trades early. Consider staggered shifts or weekend work. Be flexible with scheduling.
Remodel Project Timeline: What to Expect Month by Month
While every project is unique, this generalized timeline gives you a realistic expectation of what to expect at each stage.
| Month | Focus | Key Milestones |
|---|---|---|
| Month 1 | Planning and Permits | Design finalized, permits applied, contractor hired, materials ordered |
| Month 2 | Demolition and Structural Work | Walls opened, beams installed, old systems removed |
| Month 3 | Mechanical Rough-In | Plumbing, electrical, and HVAC systems installed and inspected |
| Month 4 | Insulation, Drywall, and Moisture Control | Walls insulated, drywall hung and finished, air sealing completed |
| Month 5 | Flooring and Cabinetry | Flooring installed, upper and lower cabinets set, countertops installed |
| Month 6 | Trim, Paint, and Fixtures | Trim installed, walls painted, faucets, light fixtures, and appliances installed |
| Month 7 | Final Touches and Move-In | Final inspection, punch list completed, cleaning, and move-in |
This six-to-seven-month timeline assumes a typical mid-size renovation (kitchen, bath, flooring) with no major structural surprises. Larger projects or unexpected discoveries can extend this by months.
How to Plan Your Remodel Timeline Like a Pro
Renovating your home is one of the most rewarding projects you’ll ever tackle. But with the right sequence, a solid plan, and patience, you can transform your space without the headaches. The order isn’t just about efficiency—it’s about protecting your investment, ensuring safety, and avoiding costly rework.
Start by mapping out your goals, budget, and timeline. Use the Project Planning Tools For Home Renovations to track dependencies and decisions. Prioritize high-ROI spaces like kitchens and bathrooms, and don’t cut corners on structural or mechanical work. Finally, build in buffers for the unexpected—because no remodel ever goes exactly as planned.
If you’re ready to dive deeper, check out our guides on Understanding Renovation Phases or How To Plan A Home Renovation Timeline That Works for step-by-step instructions tailored to your project type.


